Creating a condition block
Condition blocks are used in branches of a form to determine whether a particular branch should be taken or not. This feature allows building smart flowing forms. And just like node blocks (question types), you can create custom condition blocks. It needs two parts to work properly:
- A builder part that makes the condition block available to the visual builder, so the block becomes usable in branches of a form;
- A runner part that validates the condition in the runner that runs the form.
This tutorial covers both parts, beginning with the builder part. It is a follow-up to the visual block tutorial, where we created a block for text input. In this tutorial, we're going to extend that example with a condition block to verify if the input matches a certain value.
Make sure to follow the visual block tutorial first, as we will use it to add the condition block.
🏗️ Builder part
The builder part of a condition block allows the visual builder to consume the block. It allows the builder user (form editor) to select the new block, attach it to a branch, and configure all of its properties and settings.
Can't wait to see the result of the builder part tutorial? Click the buttons below to run or try a live code example.
![]()
![]()
1️⃣ Declare the block
Let's start with the basic code of a condition block and then go through that code. Add a new file text-input-condition.ts to the project you've created earlier in the visual block tutorial. Then copy the following code to that file:
import { tripetto, ConditionBlock } from "@tripetto/builder";
import { TextInputBlock } from "./text-input-block";
import icon from "./icon.svg";

@tripetto({
  type: "condition",
  context: TextInputBlock,
  identifier: "text-input-condition",
  label: "Text input match",
  icon
})
export class TextInputCondition extends ConditionBlock {
  // BLock implementation here
}
This code is all you need to declare a new class with the name TextInputCondition. The class is derived from the base class ConditionBlock that is imported from the Tripetto builder package. The base class has all the core functionality of a condition block, so you can easily extend it with the functionality you need. This example has no further implementation yet, so the class is still empty. We'll come to that in a moment.
First, let's talk about the @tripetto decorator. This so-called class decorator is used to register the block to the Tripetto builder. Tripetto uses dependency injection to retrieve blocks that are registered using the decorator. The identifier, label, and icon of the block are all supplied to that decorator and are used by the visual builder to allow the user to select the block and assign it to a branch. There is also a context property with a reference to the TextInputBlock. This indicates that the condition block applies to the context of that visual block.
Now we can add the functionality to the block that we need for the text input condition. We need to do four things for that on the builder part:
- Define the properties for the condition block;
- Instruct the builder how the user can manage the block properties and settings;
- Add a condition template to the
TextInputBlockclass; - Implement a dynamic block name.
Let's do that in the following steps!
2️⃣ Define block properties
This condition block is going to compare the current value of the text input block with a value set for the condition. So, we need a property to store this value for the condition block. Let's add a field for that to our class. Update the highlighted lines in text-input-condition.ts:
import { tripetto, definition, ConditionBlock } from "@tripetto/builder";
import { TextInputBlock } from "./text-input-block";
import icon from "./icon.svg";

@tripetto({
  type: "condition",
  context: TextInputBlock,
  identifier: "text-input-condition",
  label: "Text input match",
  icon
})
export class TextInputCondition extends ConditionBlock {
  @definition
  value = "";
}
We need to decorate the field with the @definition decorator. This decorator instructs the builder to include the field in the form definition. The property will then be automatically saved to and retrieved from the form definition.
Read the Properties guide to learn more about defining properties for your block.
3️⃣ Define block editor
Now that we have a property for storing the value for the condition, we need to instruct the visual builder on how to manage that field. Therefore we need to add a method to the TextInputCondition class and then decorate it with the @editor decorator. This method will be invoked by the builder when the editor panel for the condition block is requested. We can use the editor field of the TextInputCondition class to define UI controls to manage the block.
The result will look something like this:
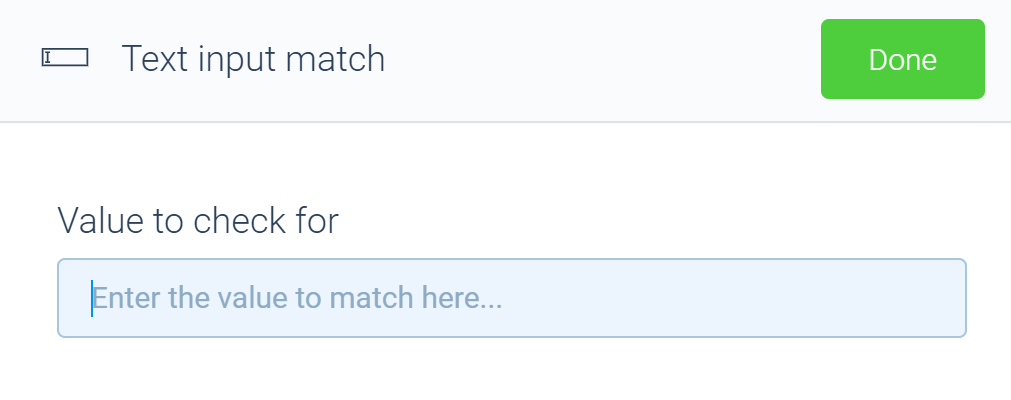
Update the highlighted lines in text-input-condition.ts:
import { tripetto, definition, editor, ConditionBlock, Forms } from "@tripetto/builder";
import { TextInputBlock } from "./text-input-block";
import icon from "./icon.svg";

@tripetto({
  type: "condition",
  context: TextInputBlock,
  identifier: "text-input-condition",
  label: "Text input match",
  icon
})
export class TextInputCondition extends ConditionBlock {
  @definition
  value = "";

  @editor
  onEdit(): void {
    this.editor.form({
        title: "Value to check for",
        controls: [
            new Forms.Text("singleline", Forms.Text.bind(this, "value", ""))
              .placeholder("Enter the value to match here...")
              .autoFocus()
        ]
    });
  }
}
4️⃣ Add condition template
The next step is to add a so-called condition template to the TextInputBlock class. This tells the builder that there is a condition that can be used for the TextInputBlock class. To do so, we need to add a method to the TextInputBlock class and then decorate it with the @conditions decorator. This method will be invoked by the builder when it wants to know if there are any conditions available for the block. We can use the conditions field of the TextInputBlock class to define condition templates.
This allows the builder user to add the condition through the context menu of the node block:
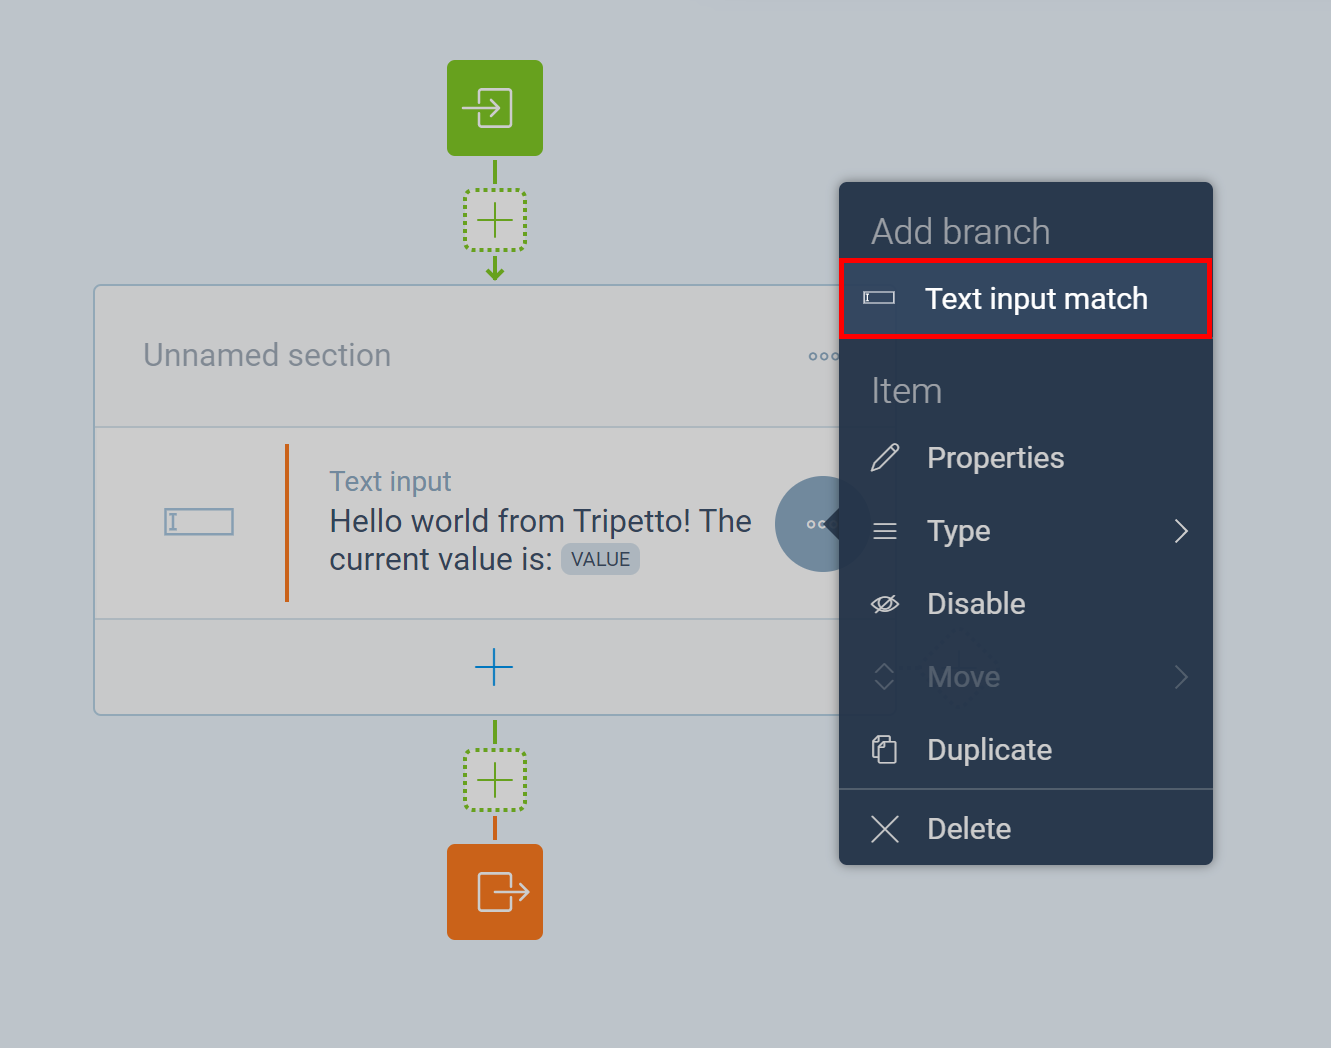
Update the highlighted lines in text-input-block.ts:
import { tripetto, slots, definition, editor, conditions, isBoolean, NodeBlock, Slots, Forms } from "@tripetto/builder";
import { TextInputCondition } from "./text-input-condition";
import icon from "./icon.svg";

@tripetto({
  type: "node",
  identifier: "text-input",
  label: "Text input",
  icon
})
export class TextInputBlock extends NodeBlock {
  @definition
  isMultiline?: boolean;

  // Add a field that holds a reference to the slot
  valueSlot!: Slots.String;

  @slots
  onSlots(): void {
    this.valueSlot = this.slots.static({
      type: Slots.String,
      reference: "value",
      label: "Text input value"
    });
  }

  @editor
  onEdit(): void {
    // First add the general group title (see https://tripetto.com/sdk/docs/blocks/api/classes/EditorOrchestrator#groups)
    this.editor.groups.general();
    // Add the name feature (see https://tripetto.com/sdk/docs/blocks/api/classes/EditorOrchestrator#name)
    this.editor.name();
    // Add the placeholder feature (see https://tripetto.com/sdk/docs/blocks/api/classes/EditorOrchestrator#placeholder)
    this.editor.placeholder();

    // Add the settings group title (see https://tripetto.com/sdk/docs/blocks/api/classes/EditorOrchestrator#groups)
    this.editor.groups.settings();
    // Add the required feature (see https://tripetto.com/sdk/docs/blocks/api/classes/EditorOrchestrator#required)
    this.editor.required(this.valueSlot);
    // Add the alias feature (see https://tripetto.com/sdk/docs/blocks/api/classes/EditorOrchestrator#alias)
    this.editor.alias(this.valueSlot);
    // Add the exportable feature (see https://tripetto.com/sdk/docs/blocks/api/classes/EditorOrchestrator#exportable)
    this.editor.exportable(this.valueSlot);

    // Add a custom feature to toggle the text input mode (see https://tripetto.com/sdk/docs/blocks/api/classes/EditorOrchestrator#option)
    this.editor.option({
      name: "Input mode",
      form: {
        title: "Text input mode",
        controls: [
          new Forms.Checkbox(
            "Allow multi-line text input",
            Forms.Checkbox.bind(this, "isMultiline", false, true)
          )
        ]
      },
      activated: isBoolean(this.isMultiline)
    });
  }

  @conditions
  onConditions(): void {
    this.conditions.template({
      condition: TextInputCondition,
      props: {
        slot: this.valueSlot
      },
      autoOpen: true
    });
  }
}
This code adds a condition template for our TextInputCondition. We can also specify initial property values for the condition. We do this for the slot property of the condition. This property holds a reference to the slot we want to check. This comes in handy in the runner part of the block later on since we need the slot value to check if the condition is valid or not.
5️⃣ Dynamic block name
The name of the condition (that is shown in the builder) is now the static text Text input match. Wouldn't it be better if that name reflects the value that is set for the condition block? We can do that by adding a name getter. Update the highlighted lines in text-input-condition.ts:
import { tripetto, definition, editor, affects, ConditionBlock, Forms } from "@tripetto/builder";
import { TextInputBlock } from "./text-input-block";
import icon from "./icon.svg";

@tripetto({
  type: "condition",
  context: TextInputBlock,
  identifier: "text-input-condition",
  label: "Text input match",
  icon
})
export class TextInputCondition extends ConditionBlock {
  @definition
  @affects("#name")
  value = "";

  get name() {
    return this.value || this.type.label;
  }

  @editor
  onEdit(): void {
    this.editor.form({
        title: "Value to check for",
        controls: [
            new Forms.Text("singleline", Forms.Text.bind(this, "value", ""))
              .placeholder("Enter the value to match here...")
              .autoFocus()
        ]
    });
  }
}
![]()
![]()
The name getter returns the value that is set or the type label of the condition block if that value is empty. We also need to apply the @affects decorator to the value field to indicate that the field affects the name of the condition.
💯 Builder part done!
And there, we have completed the builder part of the condition block! You can now create an example form definition that contains your new block. Click the Save button in the toolbar of the builder CLI to save it to ./example.json. The contents of this file can be supplied to the runner while developing/testing the runner part.
Next, we're going to define the runner part of the condition block.
🏃 Runner part
The runner part performs the evaluation of the condition block. Condition blocks are invisible blocks and don't need rendering to the UI of the runner.
Can't wait to see the end result of the runner part tutorial? Click the buttons below to run or try a live code example.
![]()
![]()
1️⃣ Declare the block
Let's start with the basic code of a condition block and then go through that code. Add a new file text-input-condition.ts to the runner project you've created earlier in the visual block tutorial. Then copy the following code to that file:
import { tripetto, ConditionBlock } from "@tripetto/runner";
import { namespace } from "@tripetto/runner-autoscroll";

@tripetto({
  type: "condition",
  identifier: "text-input-condition",
  namespace
})
export class TextInputCondition extends ConditionBlock {
  // Block implementation here
}
This code declares a new class with the name TextInputCondition. The class is derived from the base class ConditionBlock that is imported from the Tripetto Runner library. The @tripetto decorator is used to register the block to the Tripetto runner.
If you want to use a condition block in one of the stock runners, make sure to make the block available in the blocks namespace of the stock runner. You can do that using the namespace property of the @tripetto decorator (when you only target one runner) or by using mountNamespace.
2️⃣ Define block properties
In our builder part we declared a field value as the string we are going to check against the text input value. We need this field in the runner part, so we add the property to the runner part class declaration to make it available to the class. Update the highlighted lines in the TextInputCondition class:
import { tripetto, ConditionBlock } from "@tripetto/runner";
import { namespace } from "@tripetto/runner-autoscroll";

@tripetto({
  type: "condition",
  identifier: "text-input-condition",
  namespace
})
export class TextInputCondition extends ConditionBlock<{
  value: string;
}> {
  // Block implementation here
}
This will make value available in the props field of the TextInputCondition class.
Read the Properties guide to learn more about defining properties for your block.
3️⃣ Define block condition
The final step is to implement the actual block condition logic. In this case, that's very simple: We are going to check if our value that is set in the block is equal to the value of the text input. If that's the case, the block condition is valid. For this we are going to declare a method in our class and decorate it with the @condition decorator. Update the highlighted lines in text-input-condition.ts:
import { tripetto, condition, ConditionBlock } from "@tripetto/runner";
import { namespace } from "@tripetto/runner-autoscroll";

@tripetto({
  type: "condition",
  identifier: "text-input-condition",
  namespace
})
export class TextInputCondition extends ConditionBlock<{
  value: string;
}> {
  @condition
  isMatch(): boolean {
    return this.valueOf<string>()?.string === this.props.value;
  }
}
![]()
![]()
We use valueOf to retrieve the value of the slot that is attached to the condition block. Then we check the string value against the value set in the block. If they match, the method returns true otherwise, it returns false.
Read the Conditions guide to learn more about building condition logic.
💯 Runner part done!
That's all we need to do for the runner part of our example condition block.
⏭️ Up next
Dive deeper into the following topics to master the art of building blocks for Tripetto:
- 🎭 Block icon
- 🏷️ Block properties
- 🎛️ Block editor
- 🗃️ Slots
- 📇 Collections
- ✅ Validation
- ⤵️ Conditions
- 🎬 Post-processing actions
- 🌍 Translations
- 📂 Boilerplate