Use file uploads from the studio in webhooks
Webhook connections send all form data to your automation tool. To use file uploads from the studio in your automations, there are some additional instructions.

When to use
When you connect your Tripetto responses to automation tools, all the submitted data can be used in your automations right away. If your form responses from the Tripetto studio include files from the File Upload block or the Signature block, you can also use those in your automations, for example to store in a cloud service. To do so, you can follow the instructions included in this article.
🚧 Warning: Automation tool/webhook knowlegde needed
We assume you know how to configure and use your desired automation tool and/or webhook. Tripetto support can not help you with configuring this and/or the services that you want to connect your Tripetto form to.
File download availability
In general the files from the File Upload block and the Signature block only are available to the owner of the form. You have to be logged in to the corresponding Tripetto studio account to be able to download the files. Now, this becomes difficult for automation tools, because those can't login to your Tripetto studio account and thus won't have access to the file downloads.
Therefore the file downloads from the studio are available to the automation tools for 24 hours after form submission. In most cases your automation scenarios are executed right after form submission, so this gives your automation tool direct access to the file download when the automation scenario is executed.
After 24 hours the file downloads will be restricted by the corresponding Tripetto studio account again. Your automation tool won't have access to the file downloads anymore from then on. Therefore it's important to let your automation scenarios execute immediately, or at least within 24 hours after form submission.
How to use
File uploads from Tripetto forms can be downloaded via a download link. To use that in your automations, you need an extra step in your automation tool to download the file into your automation scenario. To demonstrate this, we use Make1 as our automation tool.
📌 Also see: Make setup instructions
We have a more detailed help article about connecting your form response to Make:
🔖 Ad 1: Make alternatives
There are alternatives to use as your automation tool. For this demonstration we use Make as our automation tool, but you can also use Zapier, Pabbly Connect or even a custom webhook. Of course it's up to you to use your favorite automation tool. Those will have comparable setups available to use files from Tripetto. We assume you know how to configure and use your desired automation tool and/or webhook.
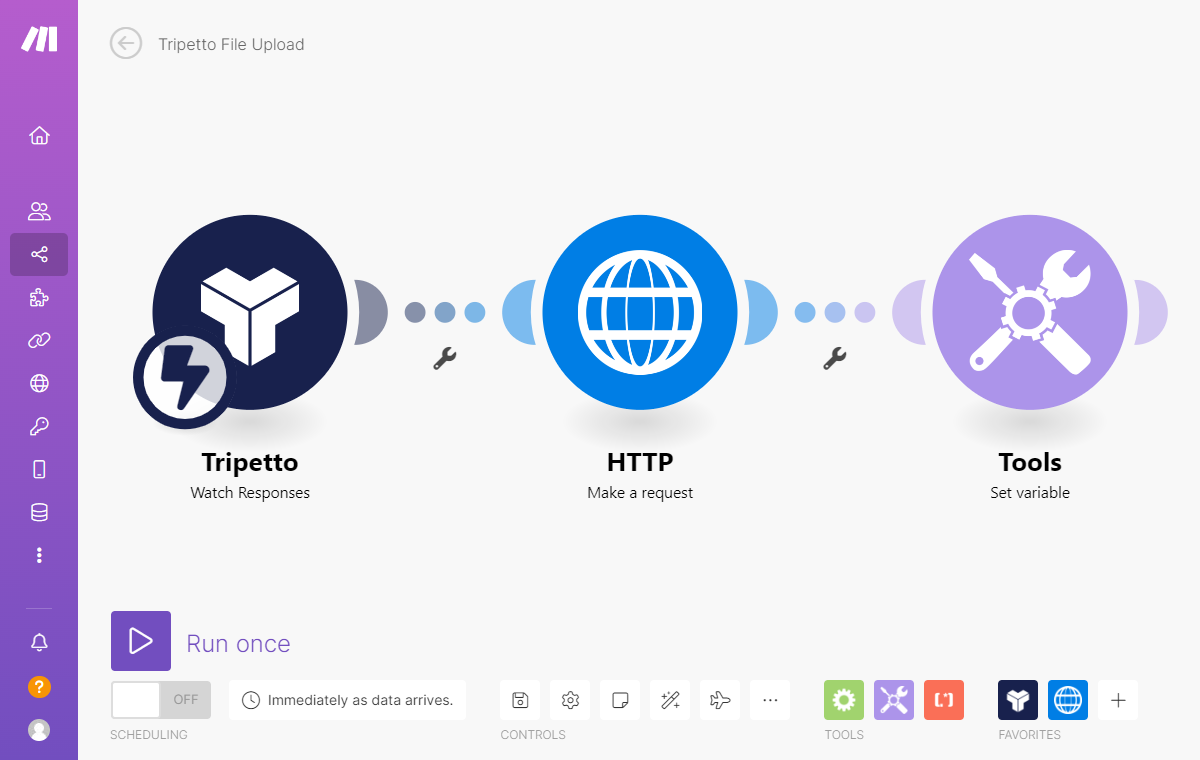
Basic automation
First we will demonstrate how to setup the basic automation to download the file into your automation tool. The basic configuration in Make looks like this:

Step 1 - Watch Tripetto responses
- Add a
Tripettomodule to your Make scenario. As trigger selectWatch responses. - Connect your Tripetto form to this webhook URL.
- Receive a form response to this module, so the scenario learns your Tripetto form structure.
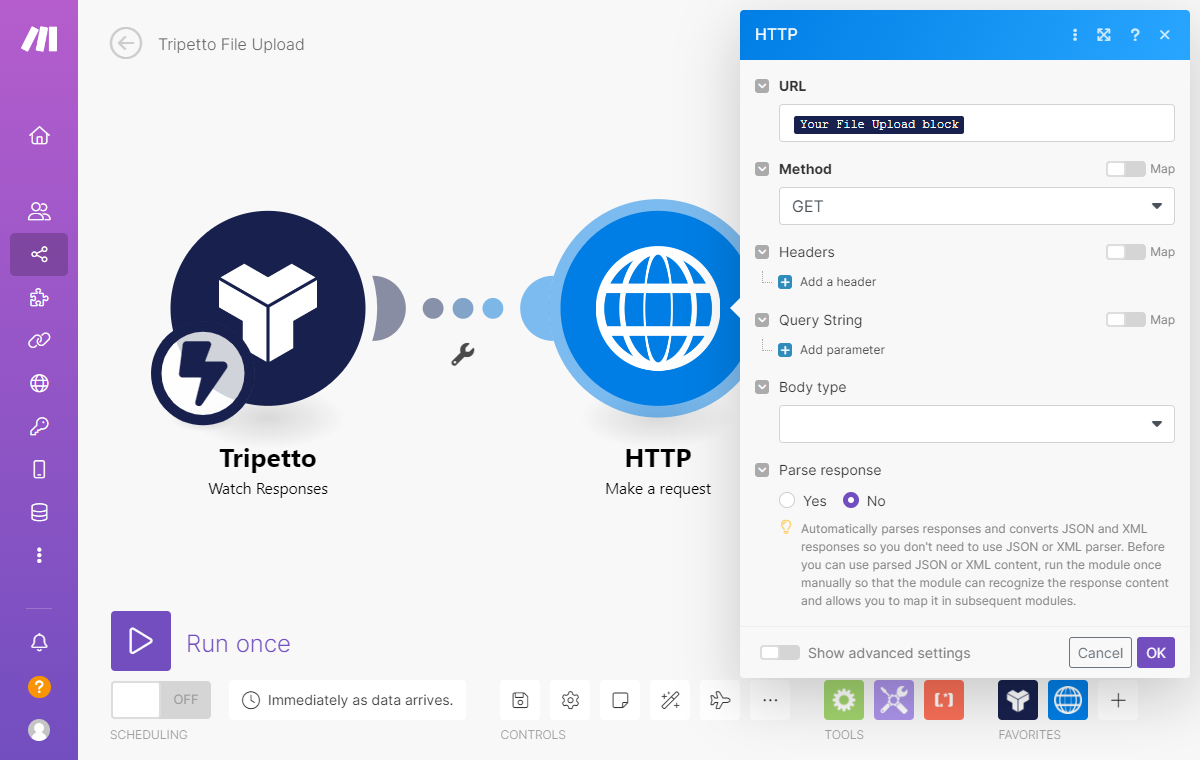
Step 2 - Download file
- Add a
HTTPmodule to your Make scenario. As action selectMake a request. - As
URLselect the corresponding File Upload/Signature block of your form from the Tripetto module you created in step 1.
Now the Make scenario will download the file from the File Upload/Signature block block, assuming this scenario is executed within 24 hours from the form submission and thus the file download is available for Make.
This is the basic setup to download the file data into your automation scenario. From there on you can now use that file data in your follow-ups in your scenario.
Basic automation with file names
If you want to store the downloaded file, you might want to use the original file name of the file that your respondent uploaded in the Tripetto form. Therefore the download link includes a query string parameter filename with the original file name as value.
📣 Info: Signature block file names
Files from the Signature block have a fixed file name in this format:
signature-YYYYMMDDHHMMSS.png
The more advanced configuration in Make, including the file name, looks like this:
Step 1-2 - Setup basic configuration
Setup the basic configuration as described in steps 1-2 above.
Step 3 - Get file name
- Add a
Toolmodule to your Make scenario. As action selectSet variable. - As
Variable nameenter a name, for exampleFile name. - As
Variable lifetimeselectOne cycle. - We now want to extract the filename parameter from the query string of the file download. To do do, as
Variable valuesetup the following:- Insert a text
splitfunction (see Make documentation).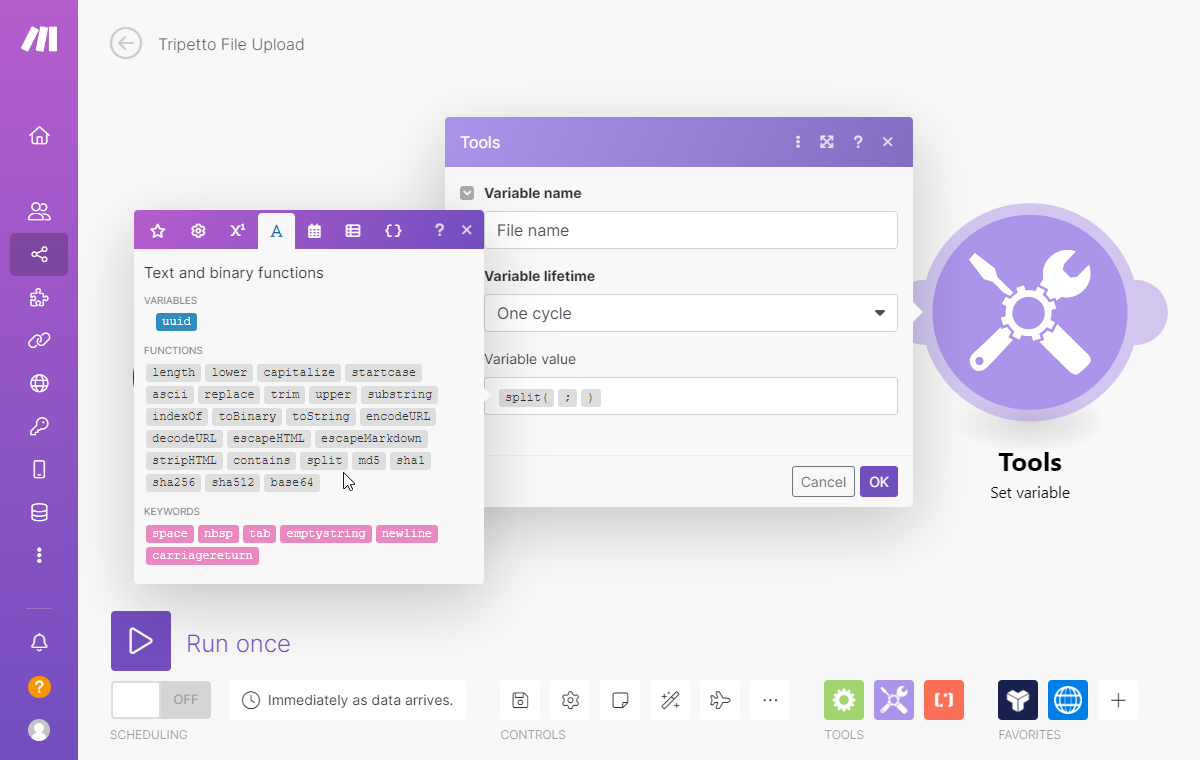
Add a variable module in your Make scenario and insert a splitfunction. - As first parameter in the
splitfunction insert the corresponding File Upload block of your form from the Tripetto module. - As second parameter in the
splitfunction enterfilename=.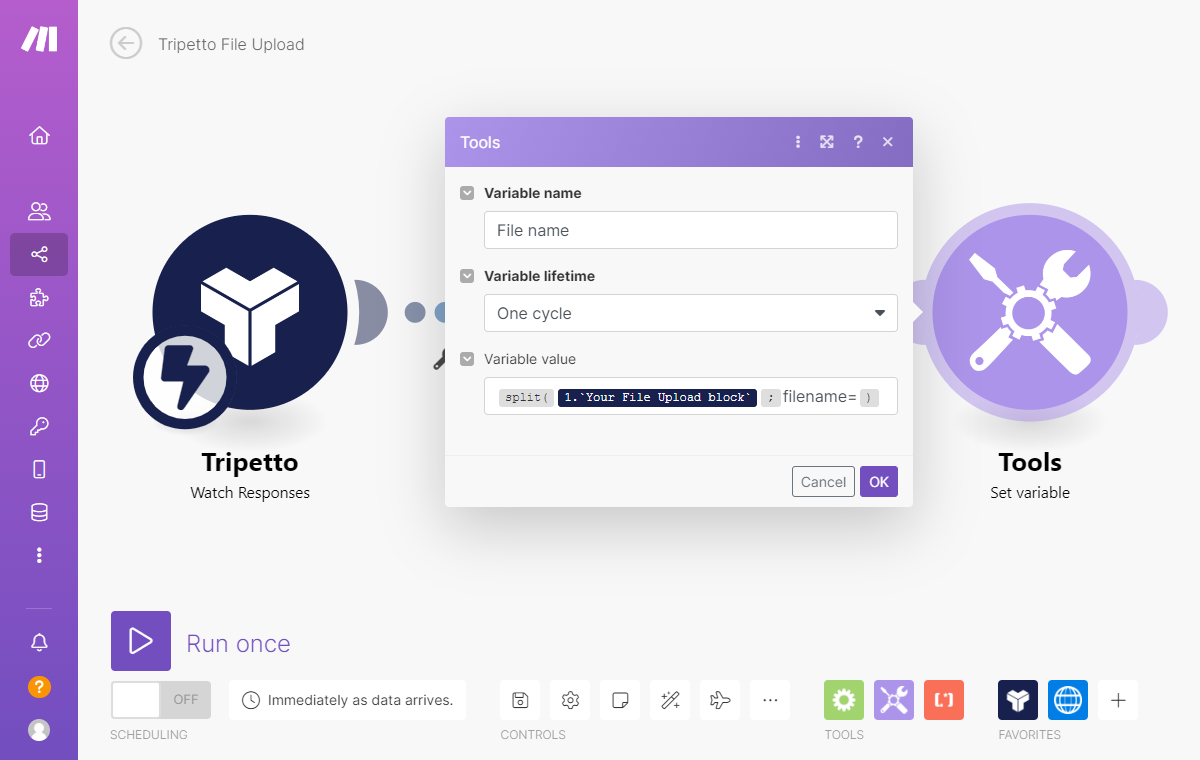
Add a variable module in your Make scenario and setup the splitfunction.
- Insert a text
Now the Make scenario has stored the original file name of the file that the respondent uploaded to your Tripetto form. From now on you can use that file name in your follow-ups in your scenario.
Example: Store file in Google Drive
An often used scenario will be to store files to a cloud storage service, for example Google Drive. In this example we will demonstrate a possible setup for that scenario in Make.
The full configuration in Make looks like this:
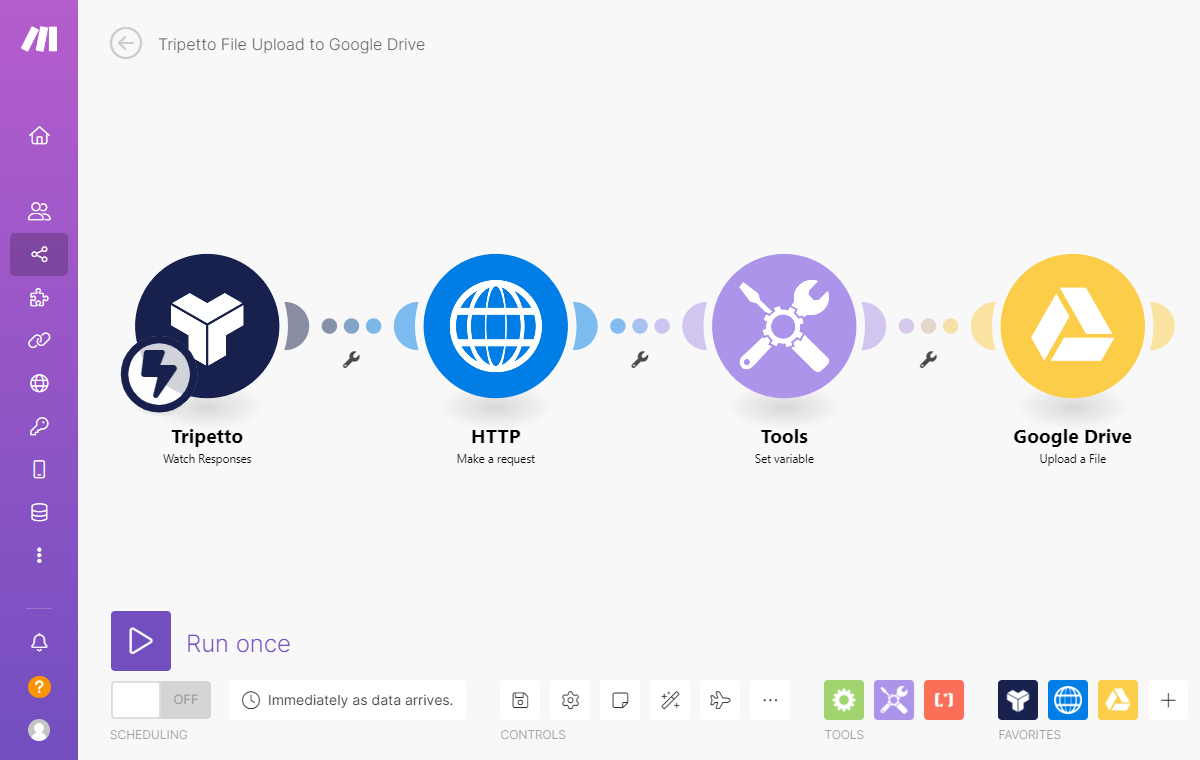
Step 1-2-3 - Setup basic configuration with file names
Setup the basic configuration with file names as described in steps 1-3 above.
Step 4 - Upload to Google Drive
- Add a
Google Drivemodule to your Make scenario. As action selectUpload a file. - Grant access to your Google account.
- Optionally select the folder in your Google Drive where the files should be stored.
- As
File nameselect the variable you created in step 3 (File namein our example). To prevent issues with encoding you can add adecodeURLfunction to the file name (see Make documentation). - As
Dataselect theDataof the HTTP module you created in step 2.
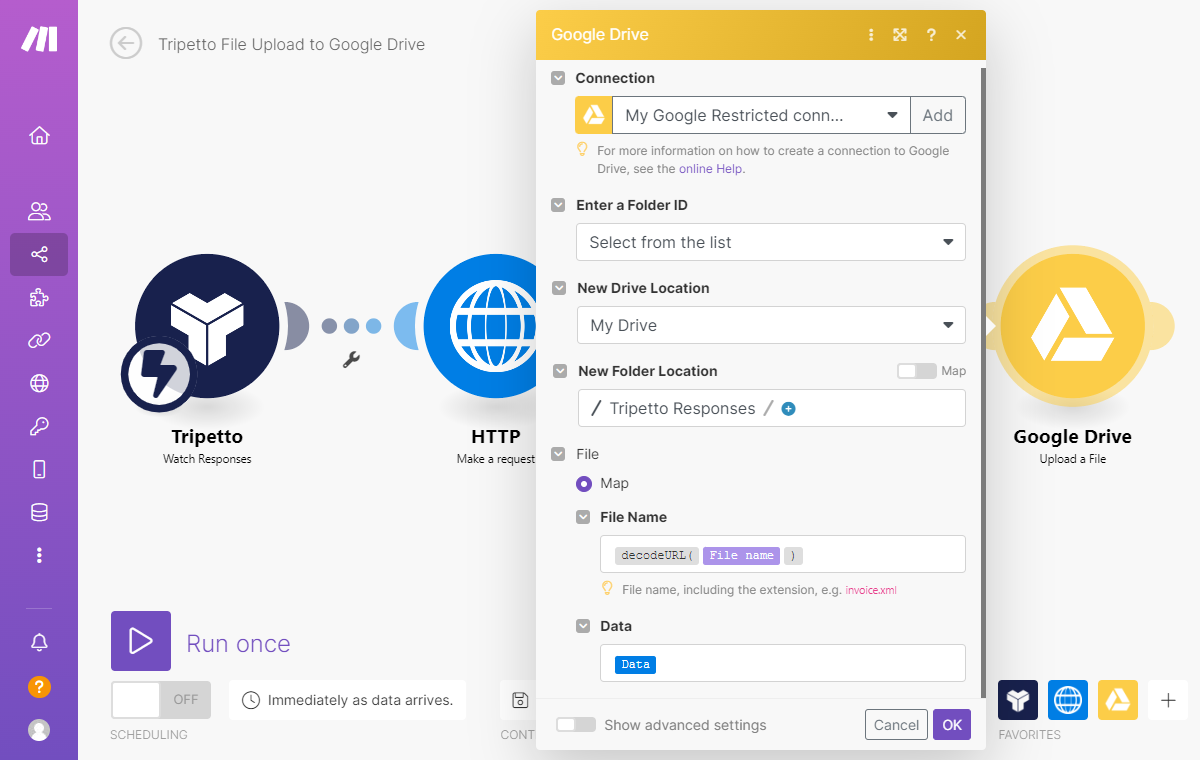
Now the Make scenario will store the file with the original file name to your Google Drive!