How to automate actions inside your WordPress site using automator plugins
Next to connecting to external services, webhooks also enable you to perform actions inside your own WordPress environment for each new result from your Tripetto forms, like creating a new user or post inside your WordPress site. Or even connect to your other WordPress plugins. Without a single line of code. Fully no-code!

When to use
In our global help articles about webhooks, we mention all kinds of external services that you can connect your Tripetto form data to, like Google Sheets, Mailchimp, Zendesk, Airtable and PayPal. But it's just as easy to do actions inside your own WordPress site/environment, for example to add a new user or edit the roles of an existing user. You can even connect to other plugins that are installed in your WordPress environment.
And the cool thing is your data doesn't even have to leave your own WordPress environment, because there are automation tools that you can use inside your own WordPress environment, like AutomatorWP and Uncanny Automator.
Examples
There are lots of possible actions you can do in your WordPress site, but these are some popular ones that will connect your Tripetto response data to your WordPress environment:
- AutomatorWP
- AutomatorWP
- Uncanny Automator
- Uncanny Automator
How to use
The global idea for automating WordPress actions based on Tripetto form submissions is the same as we described in our other webhook help articles: you always have a webhook URL in your Tripetto form that gets triggered after each form submission. And with that trigger, you can automate all kinds of actions. Click here for the global help article about webhooks.
But now we're going to have a look at how to do that within your own WordPress environment. We do that by using WordPress specific automator plugins that let you do actions inside your own WordPress environment, without the data ever leaving your WordPress environment. Setting this up takes a few steps, which we will describe globally in this article.
🚧 Warning: Automator plugin knowlegde needed
We assume you know how to configure and use your desired WordPress automator plugin. Tripetto support can not help you with configuring this and/or the services that you want to connect your Tripetto form to.
Step 1 - Prepare WordPress automator plugin
First step is to be able to use a webhook inside your own WordPress environment. There are several plugins that can help you with that. Such plugins let you create a webhook URL on your own domain, which you can use to send your Tripetto data to.
A few popular automator plugins in WordPress are the following:
 AutomatorWP
You can simply install the AutomatorWP plugin to your WP Admin. Webhooks are usable via an add-on. Click here for more information about AutomatorWP.
 Uncanny Automator
You can simply install the Uncanny Automator plugin to your WP Admin. Webhooks are available in the Pro plan. Click here for more information about Uncanny Automator.
💡 Tip: Choose your automator plugin wisely
AutomatorWP and Uncanny Automator are some examples, but there are also other automator plugin that you can use. It depends on your own needs, wishes and budget which plugin suits you best. That's why we advise to have a close look at the features and pricings before you select a certain automator plugin.
In your automator plugin
In the automator plugin of your choosing, create a webhook as a trigger. That will result in a webhook URL that you can copy to your clipboard so you can use that in step 2.
Step 2 - Connect webhook
After you have gathered your webhook URL, you can connect that with Tripetto.
In Tripetto:
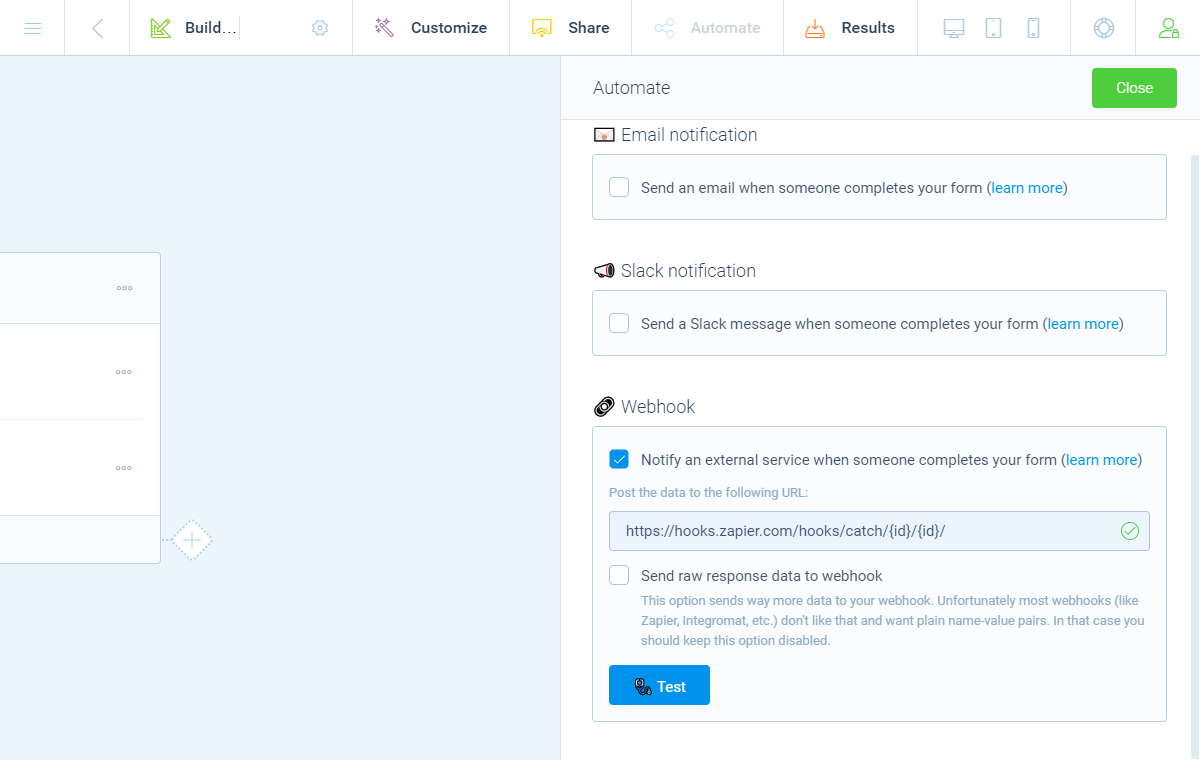
Switch to your form in Tripetto. At the top menu bar of the form builder click Automate Click Connections. The Connections pane will show up on the right side of the form builder.
The fourth option in this screen is Custom webhook. After enabling the feature Submit completed forms to a custom webhook you can paste your webhook URL.
Important: leave the option Send raw response data to webhook disabled. Don't select that option, as it's for experts only.
Step 3 - Receive response data
Next step is to test if your automator plugin is indeed receiving the response data from your Tripetto form.
In your automator plugin:
It depends on your automator plugin how that's done exactly. In most cases, you have to temporarily open your webhook connection to be able to receive a test response. If your webhook is opened, you can submit a test entry.
In Tripetto:
Now, switch back to Tripetto and submit some response data. You can do that by simply clicking the Test button. That will send a test response from your form to your automator plugin with some dummy content. Or you can also simply submit a real form entry yourself via the shareable link of your form.
In your automator plugin:
If the connection is working, you will now see the response data from your form. Great, you're connected!
Step 4 - Add WordPress actions
Now it's time to perform the WordPress actions you want to automate.
In your automator plugin:
It depends on your automator plugin and the action(s) you want to perform how that process works exactly. The overall idea is you can add follow-up actions and use the form data from Tripetto in those actions. For example use an email address from the form submission to create a new user in WordPress.
Step 5 - Activate magic
Last step is to activate the webhook, so it will receive new form entries.
In your automator plugin:
If you have tested your connection, you can activate your automation process. Again, it depends on your automator plugin and the action(s) you're performing how you can activate your automation process.
From now on, each completed submission of this Tripetto form in your WordPress will send its data to your webhook and the webhook will execute the magic.