
Connecting your WordPress form to a Google Sheet in 2022 - Step by Step Guide
Forms are ideal to easily collect meaningful data, but storing that data so you can use it for analysis is a whole different game. This post will show how you can connect your WordPress forms to a Google Sheet.
Forms are a great way to collect data from your website visitors. They can be used for contact forms, customer feedback, lead generation, sales, support. Basically any type of interaction you want with your customers. Forms can be used to collect data in a simple way, or to create conversational experiences that help you understand your customers better.
But storing the data collected in a meaningful way for analysis is a whole different game altogether. Quite often, you’ll receive your data via email only, which makes analyzing your data almost impossible. And even if your data is stored in a database, it’s still hard to structure that in a way that you can analyze it.
For those reasons, you might want to use a different platform or other services like Google Sheets to store your data and be able to analyze it. In this article, we’ll explore how to connect your WordPress form with Google Sheets.
Why should I connect my WordPress form with Google Sheets?
Let’s say you have the best performing form on your website that brings you tons of data about the thoughts of your customers about your products and services. The fact that your form performs so well is great of course! But that’s worth nothing if you don’t have the tools to properly analyze that collected data and transform it into valuable insights that you can act upon.
Luckily there are services that can help you to get a step closer to those insights! We all know Microsoft Excel and its powers to store large amounts of data in a structured way. Google Sheets is a powerful alternative to Microsoft Excel which has also become more popular with the years.

A few great benefits of Google Sheets are:
- Google Sheets offers largely the same functionality as Microsoft Excel.
- It is located in your Google cloud, so you always have access to all your spreadsheet files from any location and any device.
- It is free to use and included in Google Workspaces for business teams.
Benefits of connecting Google sheets with WordPress form to manage form data
Now that we know that Google Sheets is a great Microsoft Excel alternative, let’s dive into the benefits of connecting your forms to Google Sheets:
- You can get more out of your data - by storing your data in a spreadsheet, you can analyze and manipulate it using formulas and functions. You can even automatically generate graphs from your data. This means you can get more insights from your data, which can help you make better decisions.
- You can share your data with others - if you want to collaborate with someone else on analyzing or using the data, being able to store it in a spreadsheet makes this much easier. Especially when that spreadsheet is in a cloud environment like with Google Sheets.
- You can use your data for other purposes - if you’re collecting data for one purpose, you might be able to use it for other purposes as well. For example, if you’re collecting information about people’s preferences for a marketing campaign, that same information could be used for customer support or product development by other teams by simply duplicating the sheet.
- You save time and improve accuracy - It reduces the chances of human error in manual input and storage of data, and automation of data being stored in Google Sheets will save you time!
How to connect WordPress form to Google Sheets?
Now that we know the benefits of storing your form data in Google Sheets, we can have a look at how you can achieve that for forms in your WordPress website. WordPress is the leading open-source CMS. You can extend and customize it just for your needs by installing plugins that you need for your purpose.
To add forms to your WordPress site, you’ll have to install a form builder plugin. There are lots of possible form plugins to choose from. Well-known form plugins are WPForms, Gravity Forms and Formidable Forms. For our demonstration of connecting form data to Google Sheets, we will be using Tripetto.
Introducing Tripetto WordPress plugin
Tripetto is a form plugin that focusses on conversational forms, which is great for your form completion rate. It’s a tool that helps you create smart, conversational forms and surveys using conditional logic and powerful visual design.

The core functionalities of Tripetto include:
- Drag-and-drop form builder that feels like you’re making a flowchart to visualize the different flows that your form offers.
- Advanced conditional logic options, including branch logic to only ask the right questions based on the given answers. It also lets you recall given answers, for example to make it feel more personal to your respondents.
- An advanced calculator to perform all kinds of calculations with the entered data.
- It enables you to display every form in 3 different form layouts:
- Autoscroll layout, which displays one question at a time and automatically scrolls through the form.
- Chat layout, which presents questions and answers in a chat format, including chat bubbles and avatars.
- Classic layout, for a more traditional format to present multiple questions at a time.
Connect Tripetto form to Google Sheets
Another feature of Tripetto that comes in handy is the webhook connection. Webhooks let you connect certain data from one service to another. Google Sheets is one of those services, so in this case we’re going to use a webhook to connect the data that we collect in Tripetto forms to a Google Sheet. Each new form response will then automatically result in a new row in your Google Sheets. From there on you can then do all the analysis that you want with your collected data.
Let’s take you along the steps to set this up!
Step 1. Prepare a Google Sheet
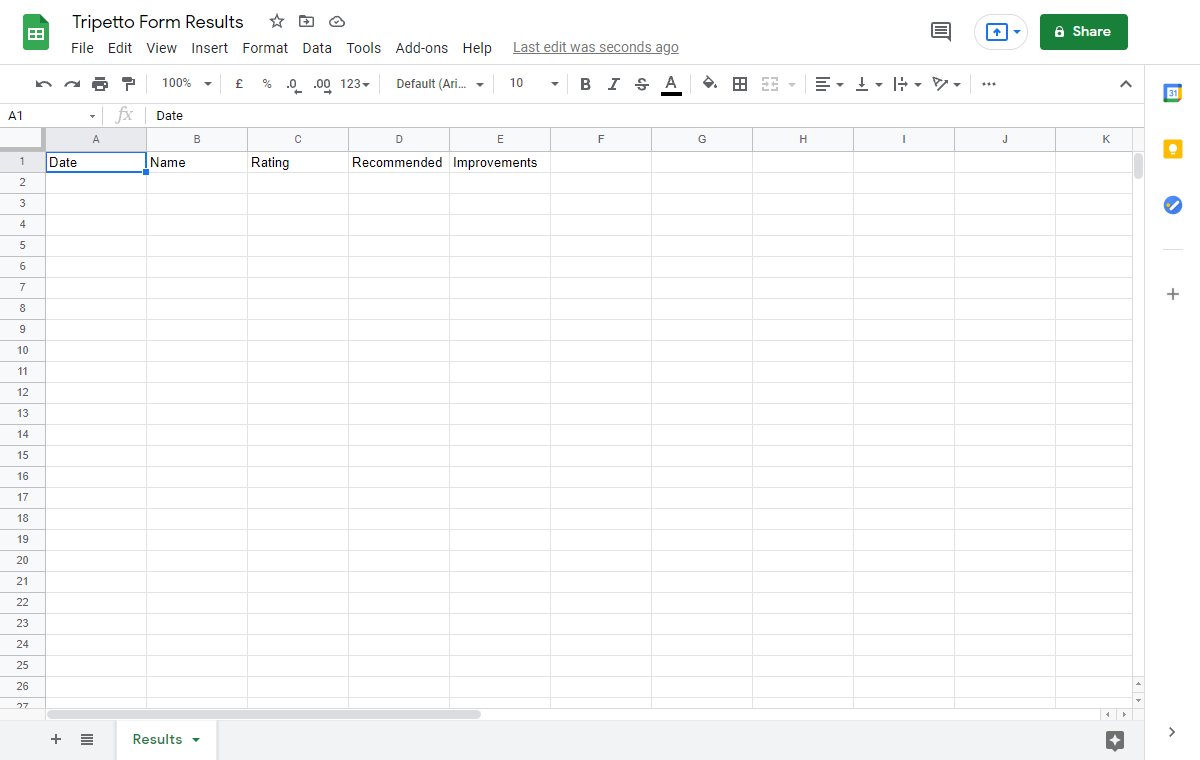
First, make sure you have a Google Sheets file that can receive the form data. You can also already prepare a worksheet by adding the column names of the data that you’re going to collect from the WordPress form.
Step 2. Setup an automation tool
To be able to connect Tripetto data to Google Sheets, you need an automation tool that connects those two services to each other. There are many automation tools available, for example Zapier and Make. For this demo we’re going to use Make and create a scenario in there.
In that scenario you first add the Tripetto app, which results in a webhook URL. You need that webhook URL in Tripetto in the next step, so copy that to your clipboard.
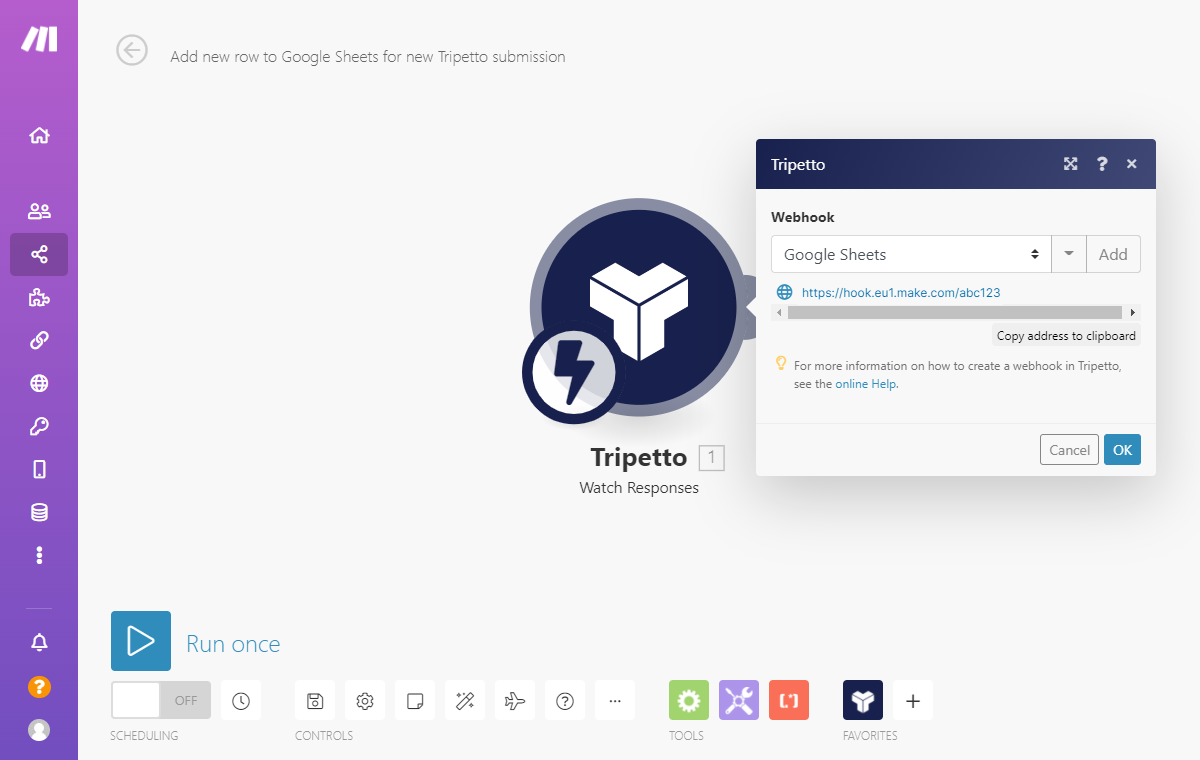
Before you switch back to the Tripetto WordPress plugin, first open up the scenario to receive test data. This makes the next step a little easier.
Step 3. Configure Tripetto webhook connection
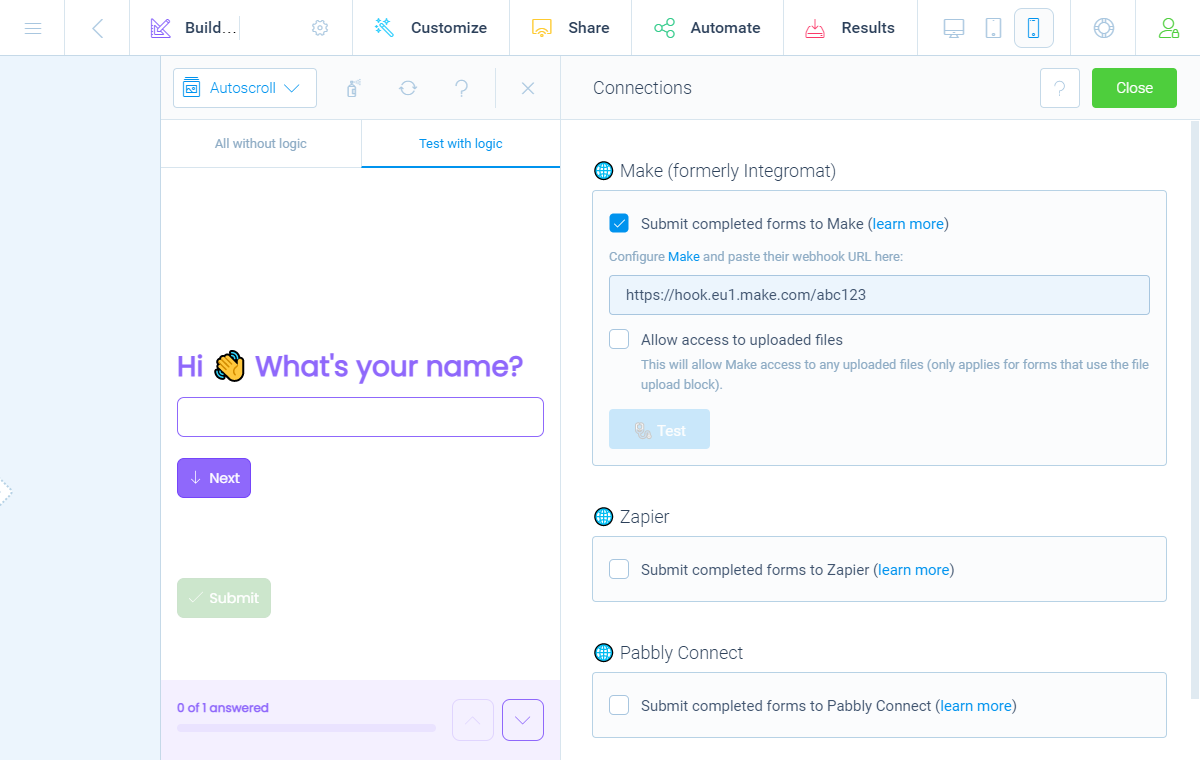
Now, switch to your form in the form builder in the Tripetto plugin and click Automate > Connections. Enable the Make feature over there and paste the webhook URL that you got from Make.
Next, you can send some dummy data to the webhook, so Make will receive the structure of your form data.
Step 4. Connect your data to Google Sheets
Switch back to your automation tool, in this case Make. You’ll see Make received the dummy data from Tripetto with the form structure included.
From here on you can connect that data to thousands of online services. For now, we’re going to connect with Google Forms. To do so, add that service to your Make scenario.
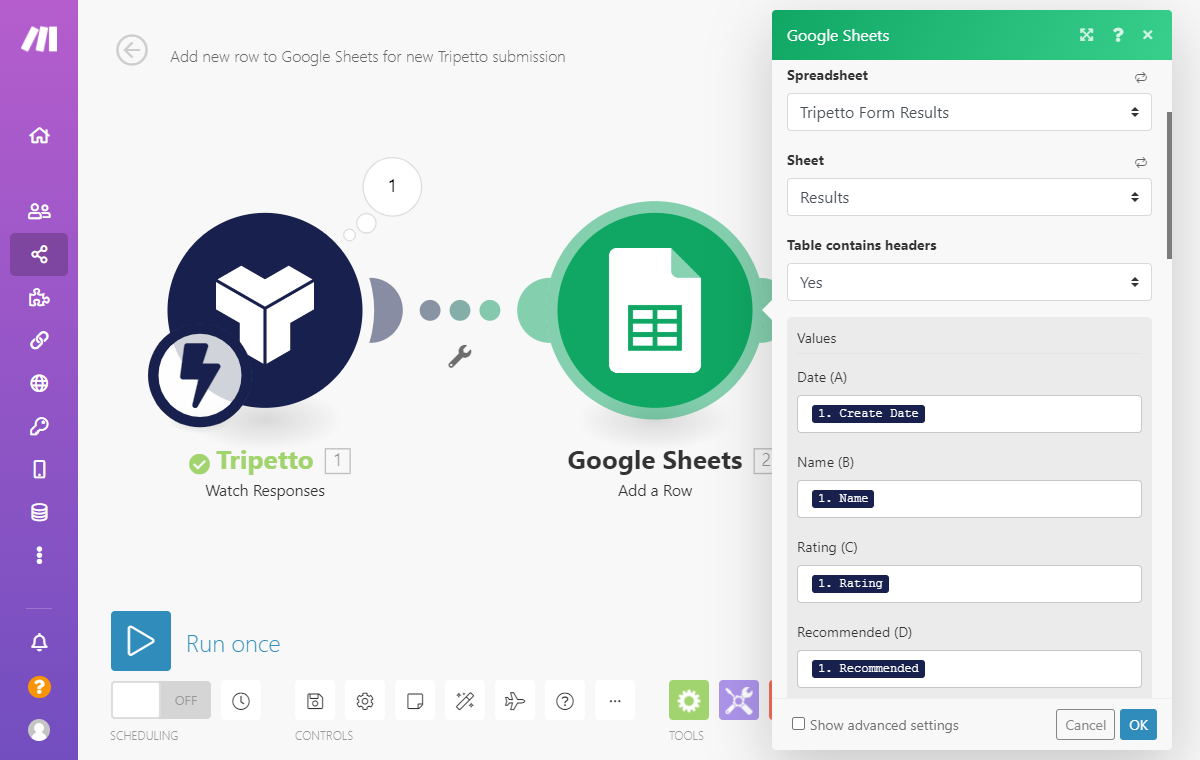
Login with your Google account and you’ll see you can select the Google Sheets file that you created before. You’ll then see that Make recognizes the header names that you entered in your Google Sheet. Now you can link the data from the Tripetto form to the corresponding columns in your Google Sheet file.
Step 5. Test and activate automation
After you have connected all the desired form data to the right columns in Google Sheets, you can test the whole automation scenario. Activate the scenario and fill out a real response to your Tripetto form in your WordPress site.
Immediately after you’ve submitted the form, you’ll see the scenario starting to work. And as a result of that, all the data that you just entered in the form is now automatically added as a new row to your Google Sheet.
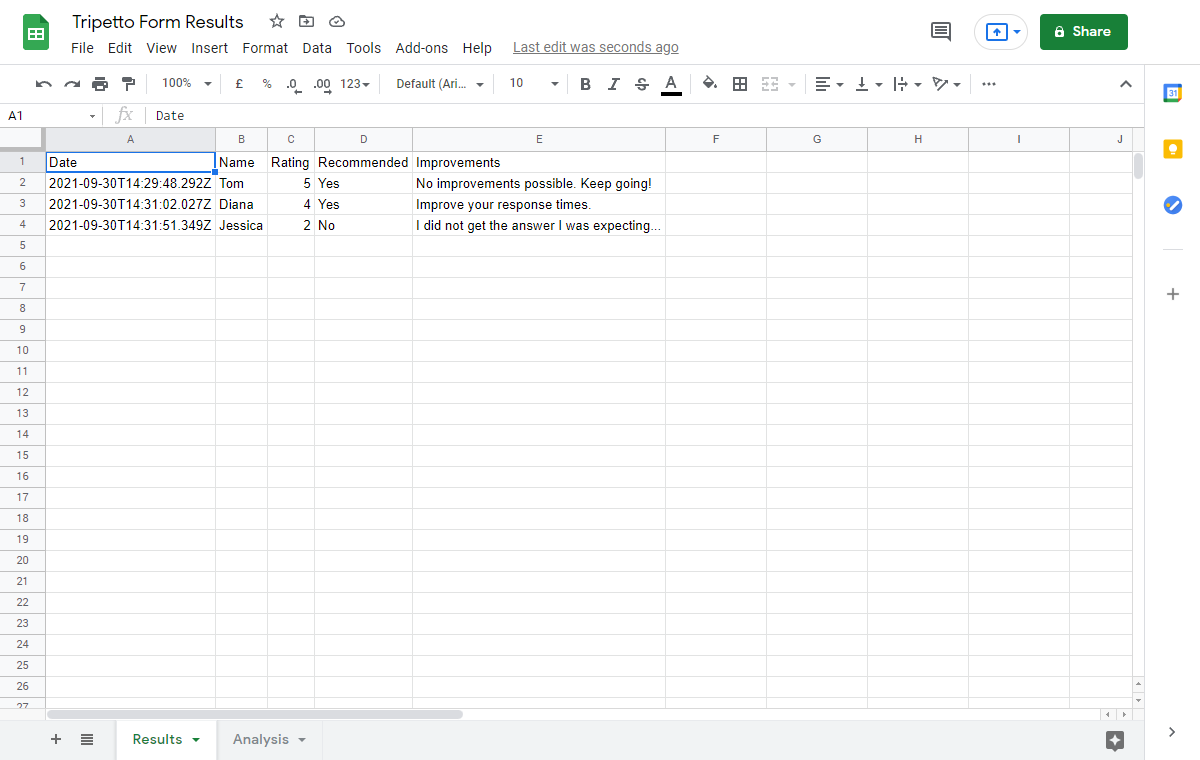
If everything is tested and works as you want, don’t forget to activate the scenario, so you don’t have to worry about this automation anymore. Each new form response that you receive from now on will be added to your Google Sheets file. Just like magic!
Connect Tripetto to other online services
The benefit of the webhook connection of Tripetto is that you can use it for almost any online service that you want to connect your Tripetto form data to. Think of your CRM tool, mailing list tool, database tool, planning tool, etc.
Our Help Center helps you with more step by step guides about webhooks. It even includes an in-depth tutorial about connecting to Google Sheets.
Also remember that you can choose your own automation tool in between Tripetto and your connected services. In this article we used Make, but you can also use Zapier, Pabbly Connect or any other automation tool that supports webhooks.
Conclusion: Get started with Google Sheets using Tripetto today
WordPress forms, like contact forms, customer feedback and support forms, are an ideal way to easily collect valuable data from your users and customers. But if that data is not stored in a convenient way, you miss valuable insights that can help you to improve your products and processes.
In this article we have seen that using a good WordPress form plugin like Tripetto helps you to collect the data in a nice way. Tripetto lets you build and distribute smart and conversational forms, right from your WordPress site. It includes advanced conditional logic features to only ask the right questions and make your forms feel like a personal conversation.
With Tripetto’s built in webhook automations you can then connect your form data to a spreadsheet service like Google Sheets. Once your data is stored there, it’s only a small step to get those valuable insights and analysis.
What’s more, you can have all the functionality of the Tripetto WordPress plugin, including unlimited webhooks starting from only $99 per year. You also get a 14-day money-back guarantee – no questions asked!

