
How to Add a Popup Contact Form in WordPress - A Step-by-Step Guide
For a form that’s highly visible, a popup can’t be beaten. This post will show you how to create a popup contact form in WordPress!
Your contact form can help with lead generation, customer support, and much more. However, you’ll need the user to know how to navigate to it. This could reduce your engagement levels and erode the User Experience (UX). However, if you add a popup contact form to WordPress, you can mitigate some of these drawbacks.
A popup form will display on the screen based on user action. This could be an attempt to navigate away from the page, browsing over a specific site element, and more. As such, you have the opportunity to bring your contact form to the user, rather than asking them to hunt it down to get in touch.
For this tutorial, we’re going to show you how to add a popup contact form in WordPress using some popular plugins. First, though, let’s discuss why you’d want to add these types of forms to your WordPress site.
Why You Should Use a Popup Form in WordPress
As far as business assets go, a contact form is one of the best (if you design and deploy it well). For starters, it is a great way to generate leads, given that you often ask for a contact email address.
In addition, you can use contact forms in a number of other ways. For instance, it could be a way to receive feedback on your products or service, or be the first line in your support provision.
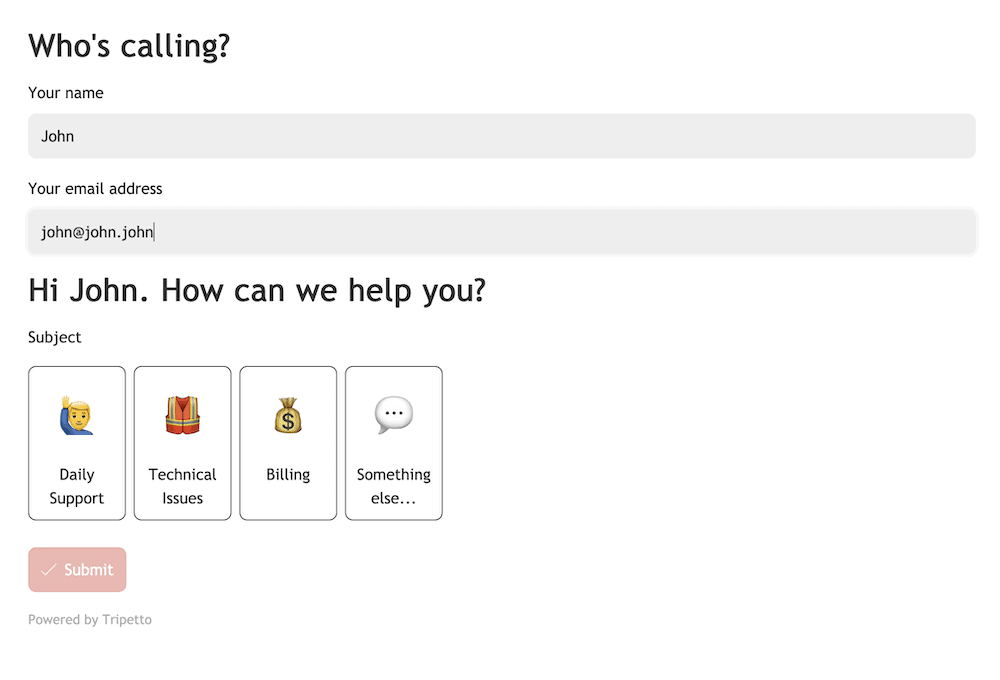
As such, the placement of your form is crucial. Your home page or landing page is a good idea, but you could extend this to every page on your site using popup functionality. This is where you’ll use specific user triggers such as the time on site or an attempt to close the page to display your contact form.
There are two big reasons why you’d want to use a popup contact form in WordPress:
- Better engagement. If you present the form to the user without the need for them to navigate your site, you can boost interaction. This should also have a knock-on effect with your conversion rate, completion rate, and bounce rate.
- Greater UX. Speaking of navigation, the user doesn’t have to hunt for your form or leave a specific page. As such, you offer the least ‘path of resistance’ possible.
While popups do have drawbacks, we’d suggest that the positives outweigh them. For the next section, we’ll discuss some of the ways you’ll add a popup contact form in WordPress.
The 2 Ways to Add a Popup Contact Form in WordPress
As with many features and functionality within WordPress, you have two ways to add a popup form in WordPress:
- Manual coding. This will give you the flexibility and versatility you’ll need to create a unique solution. However, the downside is the advanced technical knowledge you have to have, not to mention the appropriate time and resources to maintain your form.
- Dedicated plugins. A form builder plugin such as Tripetto will help you create a suitable WordPress contact form with the same amount of scope as a manual solution, without the need for technical knowledge. What’s more, you can find WordPress plugins to integrate popup functionality too.
You’ll find lots of options for contact form plugins, but Tripetto is number one. Here’s why:
- Tripetto can counteract the invasive nature of popups through its feature set. You can create dynamic, conversational forms that can feel like talking to a human. Also, conditional logic such as the ability to recall values can help you to personalize a contact form based on previous responses.
- You get to customize almost any aspect of your form (including colors, fonts, and backgrounds) using the drag-and-drop form builder. You also get to customize input controls such as radio buttons, checkboxes, drop-down menus, and more. You’re able to judge your design using the built-in live preview, both with and without logic.
- Apart from the in-form customizations, you can also influence the overall structure and design using switchable ‘form faces’. These let you adopt a classic design that only presents the fields, an autoscrolling option that focuses on one field at a time, or the chat form face. This option presents your form in a question-and-answer style, which is perfect for conversational forms.
- Tripetto is a fantastic plugin that works natively within WordPress. However, you can also connect to thousands of other third-party services using Tripetto’s webhooks and platforms such as Zapier, Make, and Pabbly Connect. You can access apps such as the email marketing platform Mailchimp or Google Sheets. What’s more, you can automate emails and notifications within Tripetto, export your form data, and save time and effort.
Tripetto is an all-in-one solution that gives you the full set of features and functionality regardless of which tier you purchase. A single-site license starts from $99, and every purchase offers a 14-day money-back guarantee.
How to Add a Popup Contact Form in WordPress in 2 Steps (Using Tripetto)
While Tripetto can do a lot, it doesn’t have native popup functionality. However, you can add popups to your site in seconds using a number of different approaches – none of which need HTML, CSS, PHP, or JavaScript knowledge! Over the rest of this article, we’ll highlight two:
- Use Tripetto’s Elementor widget within a popup to display your contact form.
- Combine Tripetto with a WordPress popup plugin such as Popup Maker to give you greater versatility and scope.
Before this step, you’ll have to make sure you have a fantastic contact form to display. We’ll show you how Tripetto can help you with that next.
1. Install the Plugin and Create Your Contact Form
First off, you’ll need to install and activate Tripetto before you begin to build. Let’s run through how to do this next.
Installing and Activating Tripetto
If you have experience with installing plugins for WordPress, the process for Tripetto is no different. We have a detailed guide on how to do this.
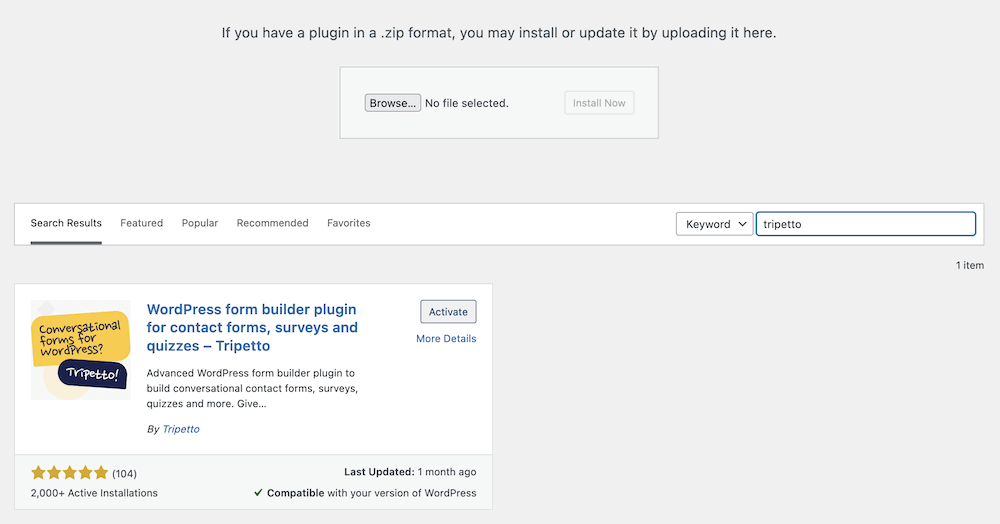
Once you finish with the installation, head to the Tripetto screen within your WordPress dashboard. You’ll come to the Onboarding Wizard:
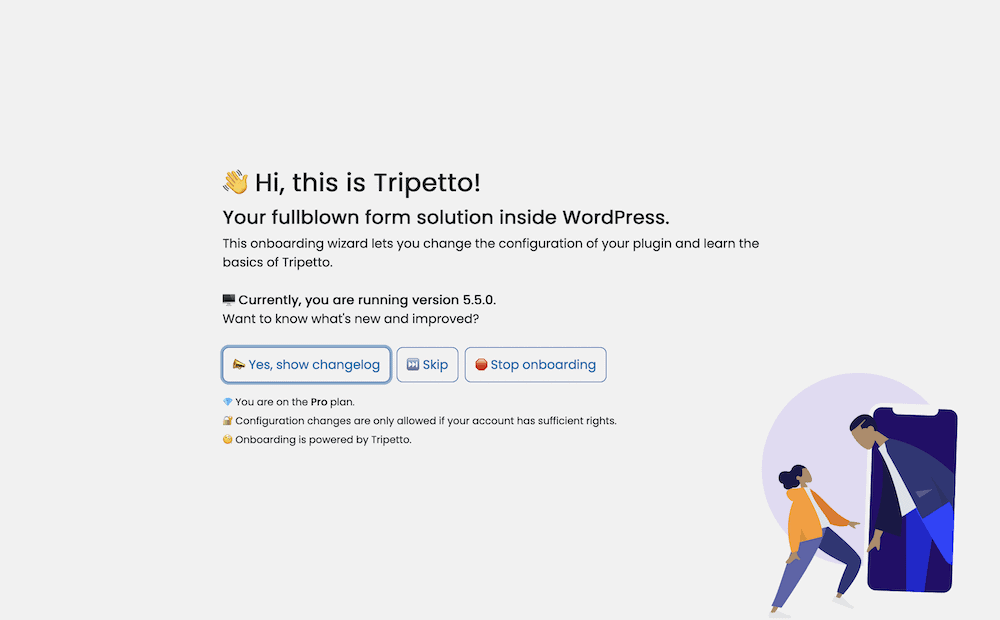
This is a step-by-step configuration to optimize your experience, and takes no more than a couple of minutes. When the wizard completes, you can then begin to create your contact form.
Building the Contact Form
To build the contact form, head to the Tripetto > Build Form screen. This will give you two options to choose from: use a form face, or start from a template. We’d recommend a template, because this can build in lots of the functionality you’ll need for your popup form in WordPress.
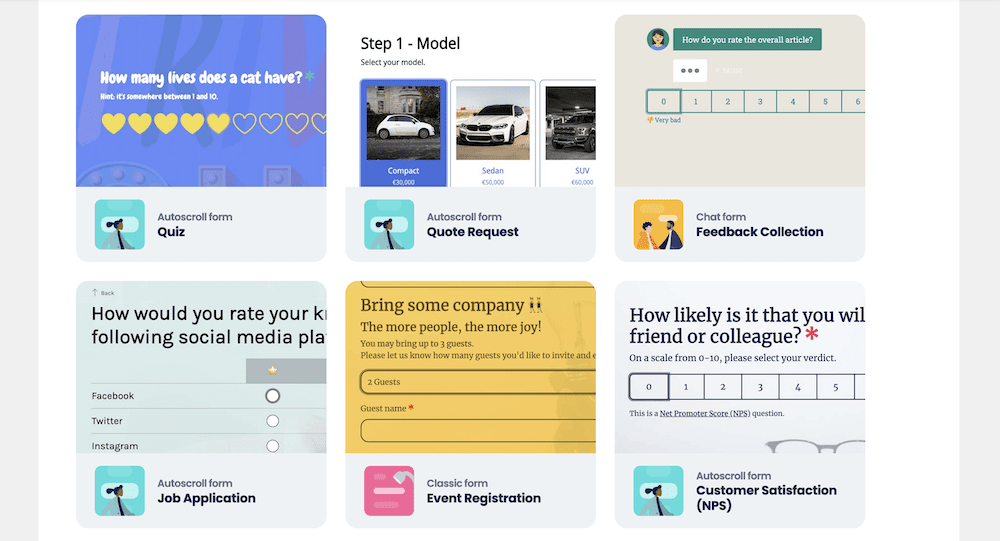
In addition, you can choose a different form face at any time from the drop-down menu on Tripetto’s live preview screen:
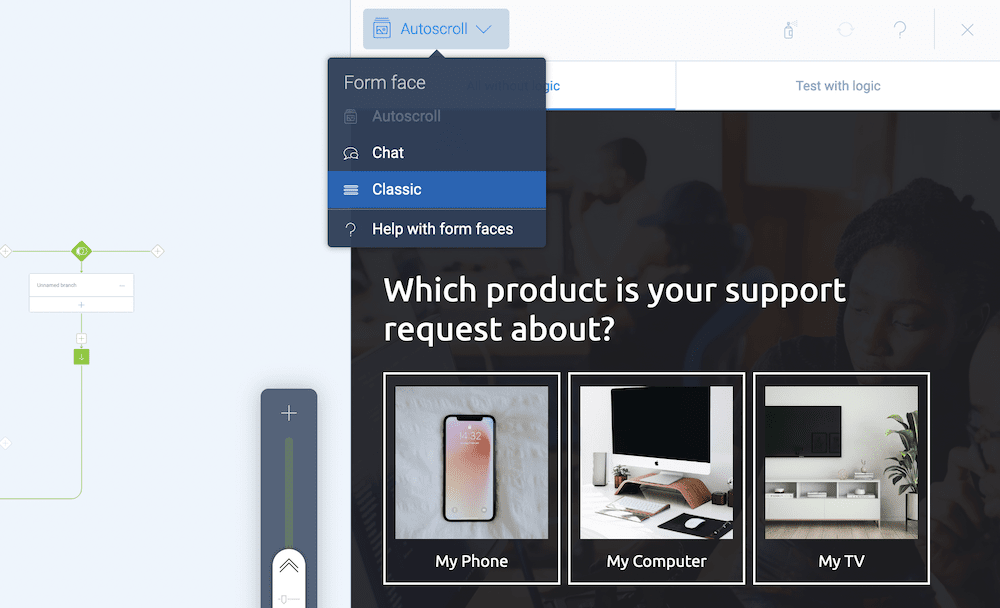
At this point, you can begin to build in your form fields and questions within the storyboard.

You’ll see from the template that all of your typical bases are covered. However, Tripetto includes a wealth of question types to cover almost every kind of form. To find them, click any Block within your storyboard, and select a new type from the drop-down menu:
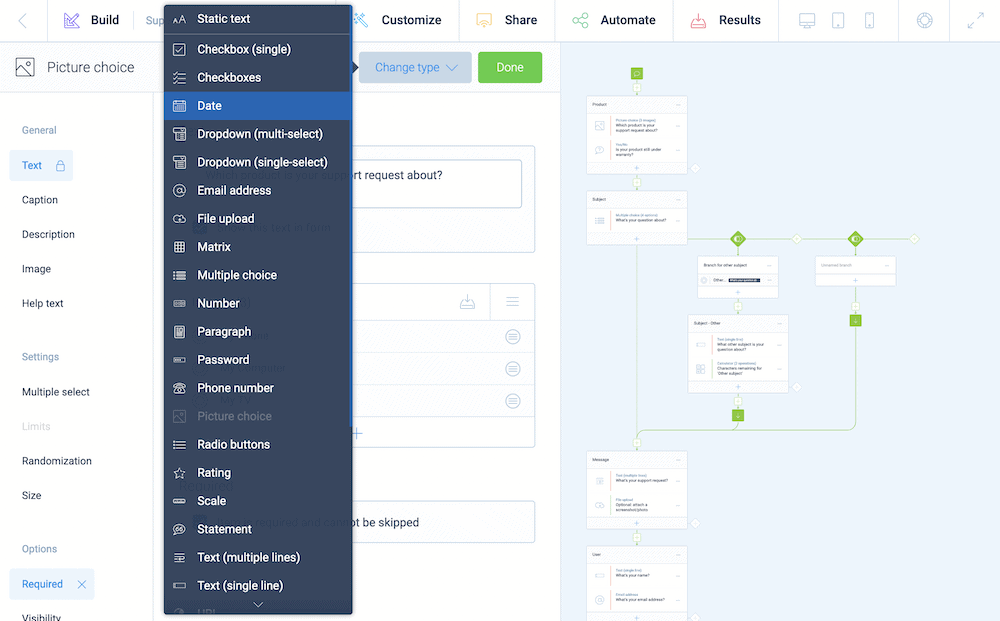
Here, you have fields to cover lots of different use cases. For example, you can add different dedicated fields for email addresses, telephone numbers, and passwords. You also have a variety of formats, such as drop-down menus, checkboxes, radio buttons, ratings, scales, and much more. There’s even a way to display images and video as options within your questions:
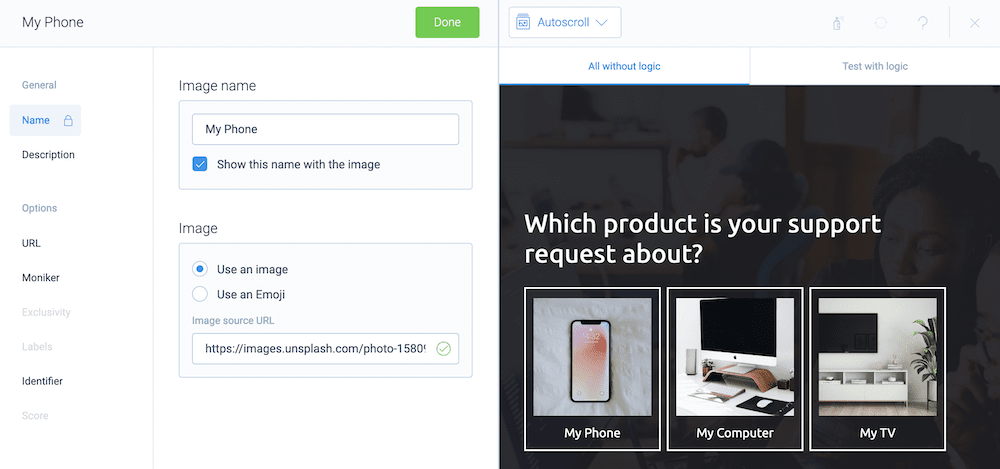
It’s a good idea to have all your questions finalized before you look at the structure of your popup form in WordPress. For this, you can use conditional logic.
Conditional Logic
Using conditional logic is a massive topic, and we can only cover the bare essentials here. However, it’s a staple of any good contact form, so you’ll want to use Tripetto’s functionality to implement it.
There are three types available to you: Branch logic, jump logic, and piping logic. Branches are something you’ll use to move the respondent through your form based on previous answers. It can be as straightforward or as powerful as you need:

Jump logic is similar to branch logic in that you’ll use it to send a respondent down a different path. However, here you’ll miss out entire question sections in order to get the user to the end of the form:
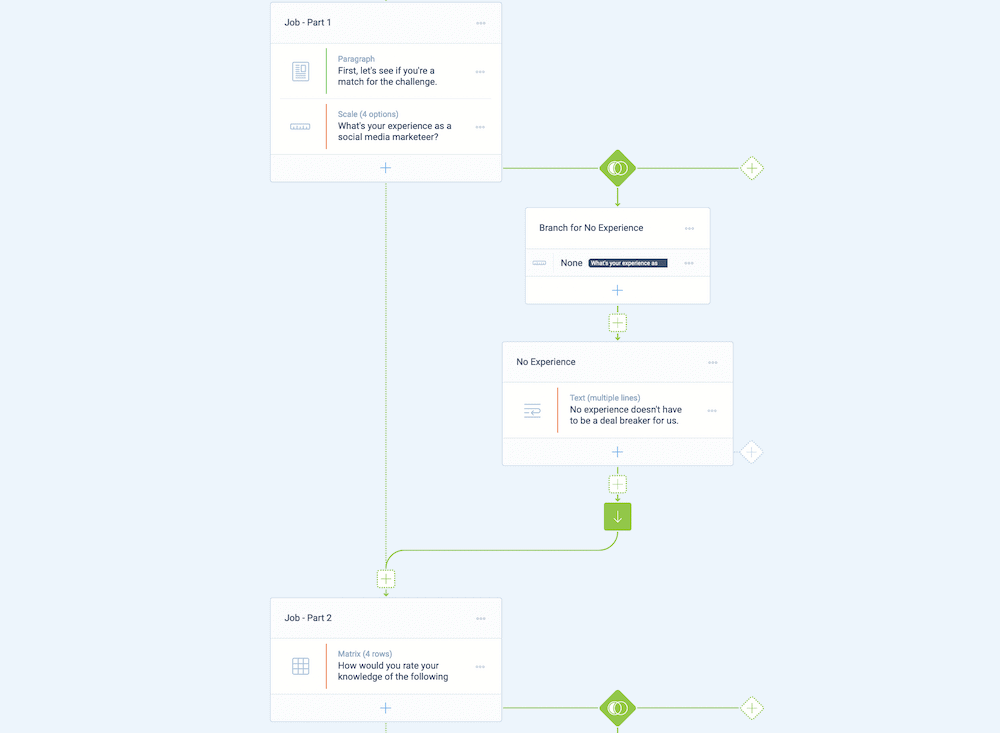
Piping logic can help you to personalize your forms. A good example is where you ask for the name of the user, and reference it elsewhere in the form. In some cases, you’ll use a Hidden Field Block and a variable to store these dynamic answers:

On the whole, conditional logic is the most powerful way you can customize your forms. As such, it makes sense to spend some time here to build out the rest of your contact form.
Integrations
While Tripetto includes a comprehensive set of ways to record form submissions and look at basic analytics, you may also want to integrate your favorite third-party service. Tripetto lets you do this through a combination of webhooks and a dedicated automation app, such as Zapier.
This is a stellar way to automate certain tasks relating to your form. For example, you can save time and effort if you add leads to a mailing list or to a custom database using services such as Mailchimp or Google Sheets.
Tripetto gives you a super-simple way to achieve this in its Automate > Connections tab:

All you’ll need is the relevant webhook from your automation app, which you’ll paste into Tripetto’s URL field:
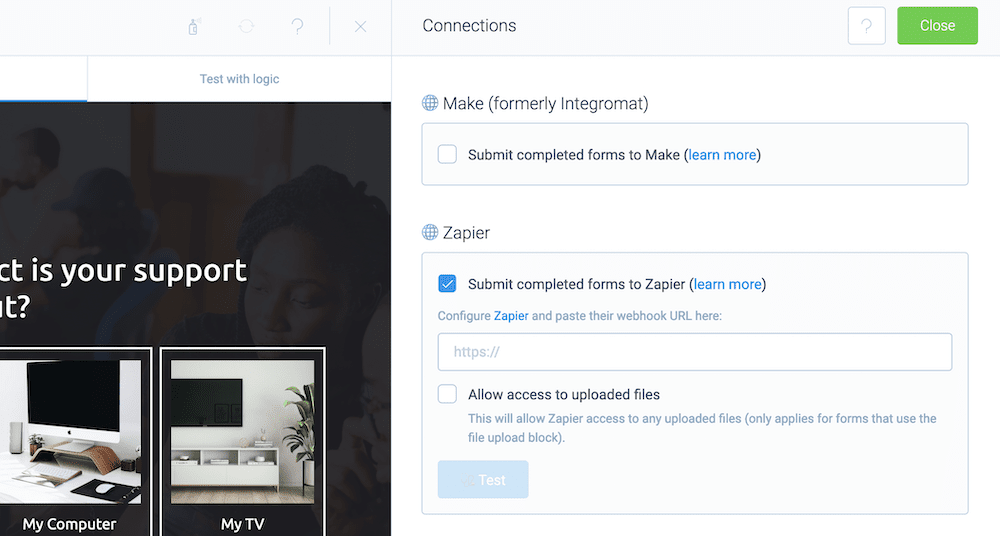
Once you click the button to test the connection, this should link your form and your third-party service in seconds.
2. Build a Popup Contact Form Using Other Popular WordPress Plugins
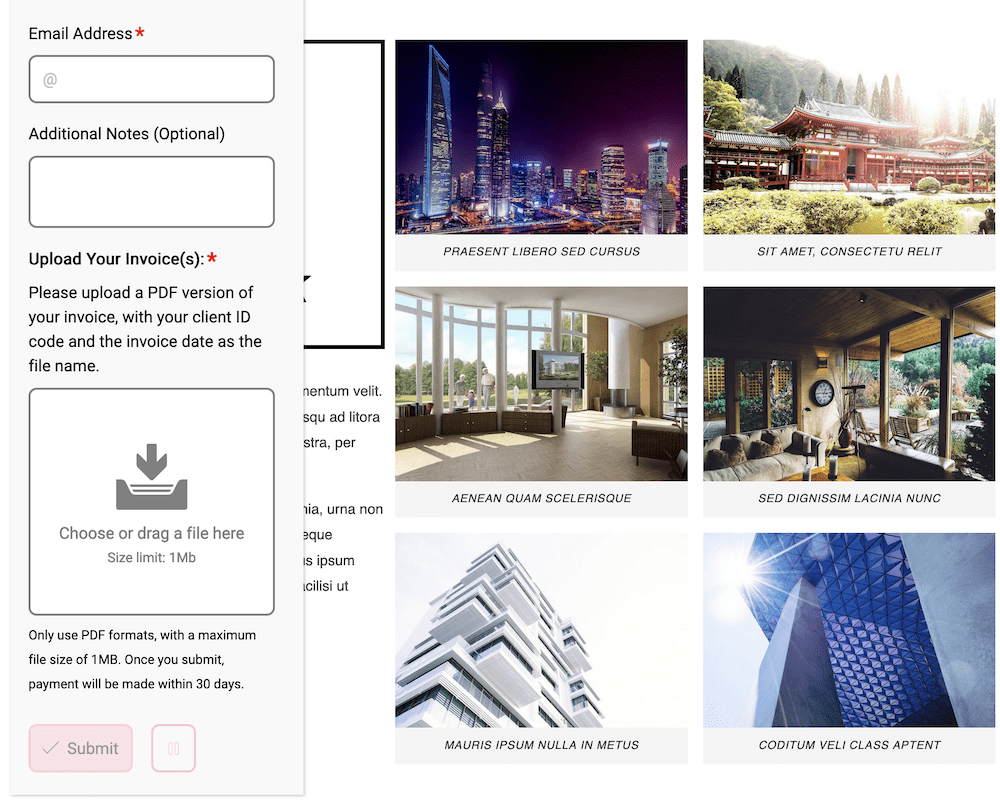
Once you have a contact form that you’re pleased with, you can look to add it to a popup using one of many solutions. However, we recommend two: the Elementor page builder, and the Popup Maker WordPress popup plugin.
In fact, Tripetto has a widget available for Elementor, which you can access like any other from the Elementor interface:
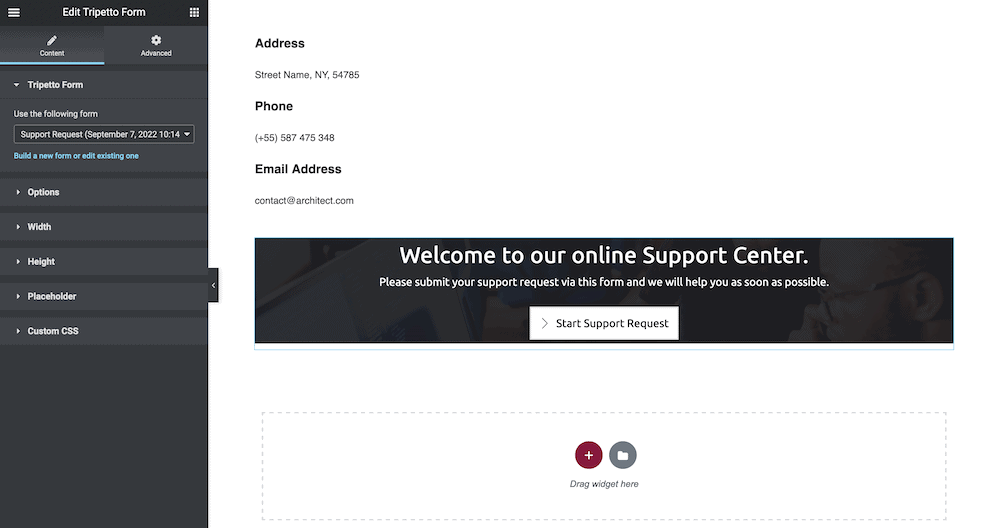
To create a popup within Elementor, head to the Templates > Popups screen within Elementor, and add a new popup. From there, you can adjust the template like any other widget within Elementor:
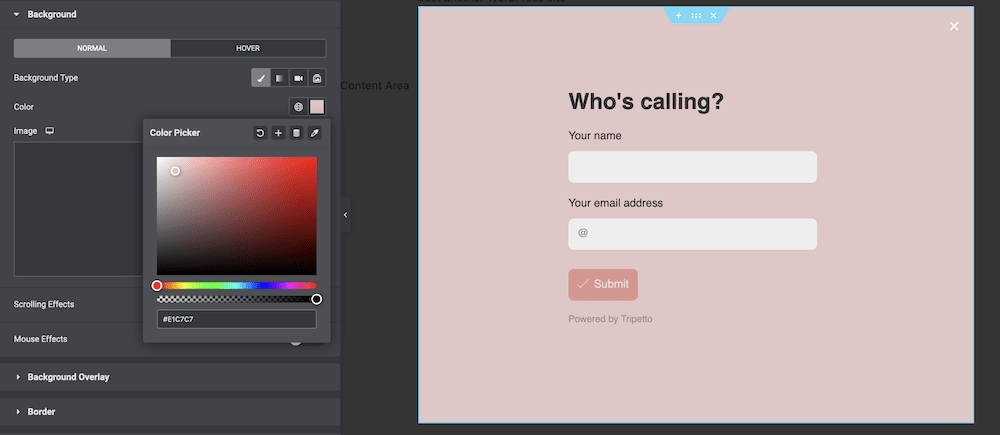
Of course, this includes the ability to add a Tripetto form to that popup. If you don’t use Elementor, there are also plugins available to help you build popups. The best WordPress solution we know is Popup Maker.

Once you install and activate the plugin, head to the Popup Maker > Create Popup screen within WordPress. This will bring you to an edit screen:
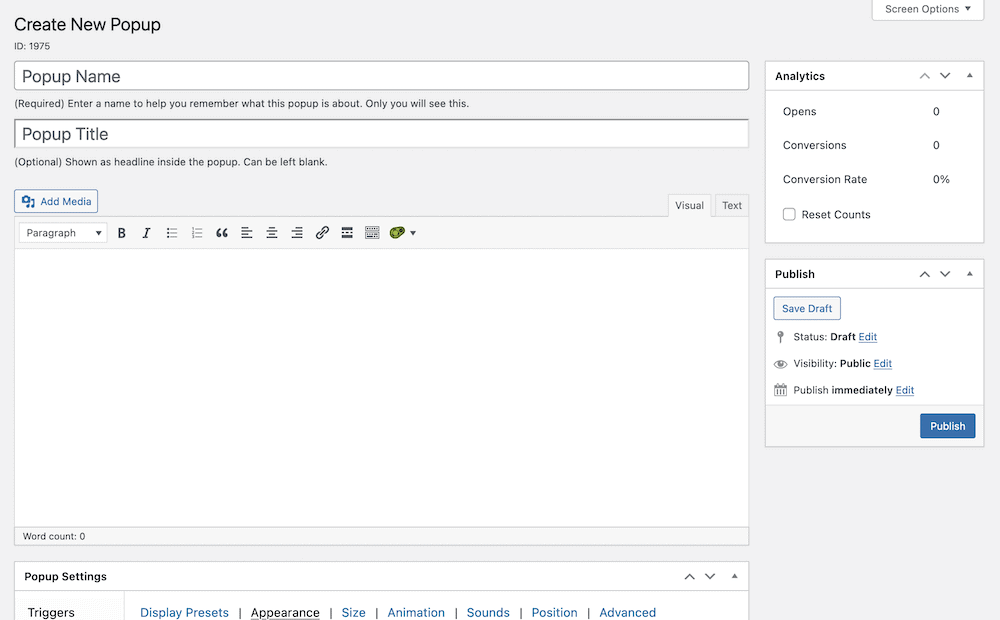
You’ll look to fill in all of the fields here (for which Popup Maker offers a comprehensive guide) and begin to add content to the popup. This is where you’ll add a Tripetto shortcode. You can find these options on the Share tab of Tripetto:
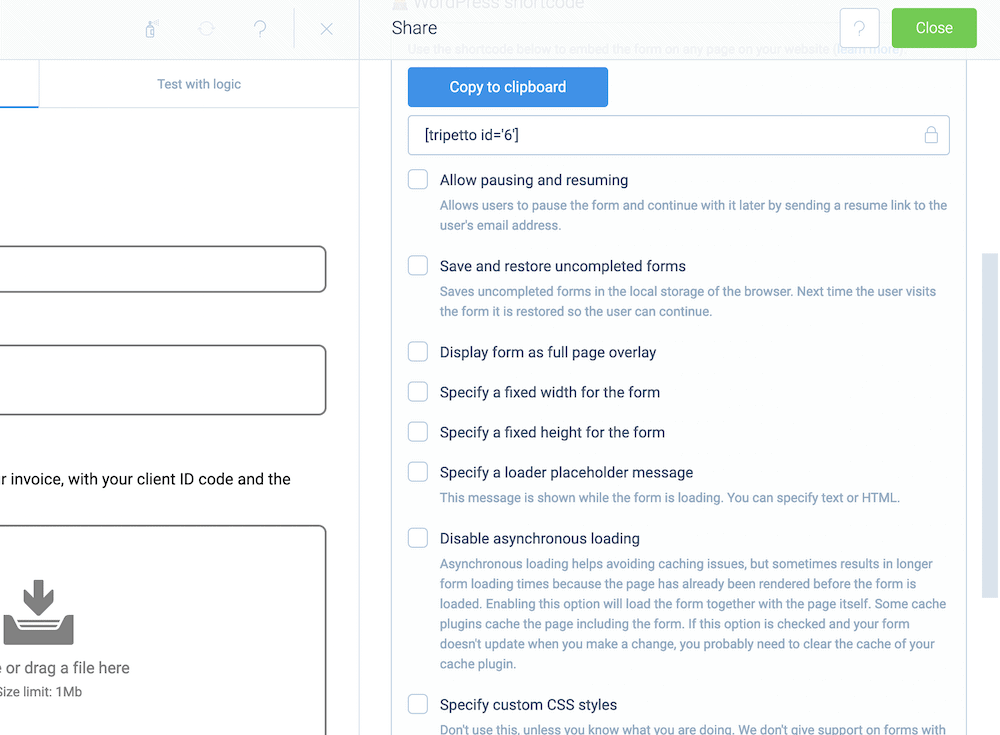
You’ll need to set your parameters using the checkboxes, then copy the form shortcode to the clipboard. From here, move to your popup editing screen and paste the shortcode into your content. You’ll also want to toggle the Popup Enabled button on this screen:
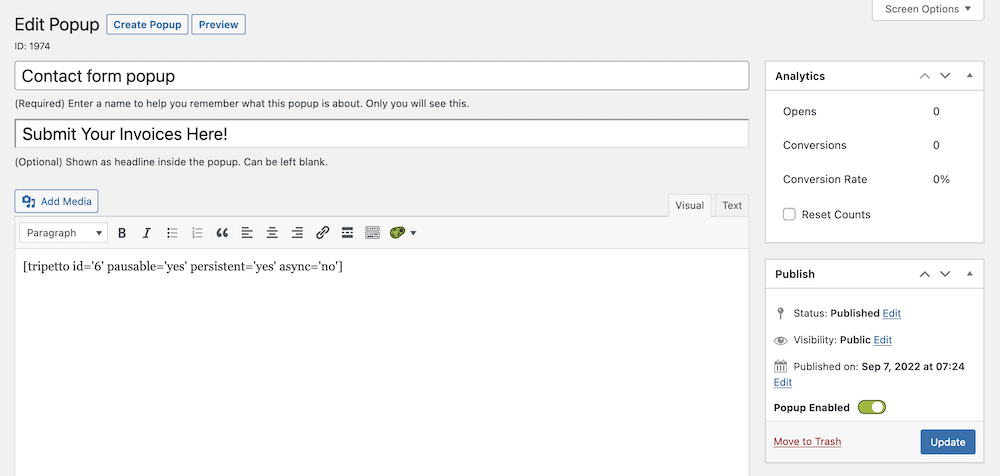
Once you click the blue Update button, check out the front end of your site to see how your popup contact form in WordPress performs. From there, make changes as you see fit.
Quick Tips to Help You Build an Engaging Popup Contact Form
It can be hard to create the perfect popup contact form in WordPress. However, there are a few typical practices and tips you can follow to ensure you have the basics nailed:
- Keep your forms straightforward, in both language and length. You’ll want to use ‘human’ language – informal, business casual, loose – in order to speak in a direct way to respondents.
- When it comes to length, this is where conditional logic can show its worth. You can create many questions for your form, but the user doesn’t have to see them. In fact, they’ll only see the most necessary and relevant questions based on your implementation and their response.
- Speaking of encouraging language, this is also something you’ll want to do with your Call To Action (CTA) buttons. It’s best to employ strong and specific nouns that ask the user to take action, and also speak in the first person: “Send My Email,” “Apply Now,” “Sign Me Up,” and more.
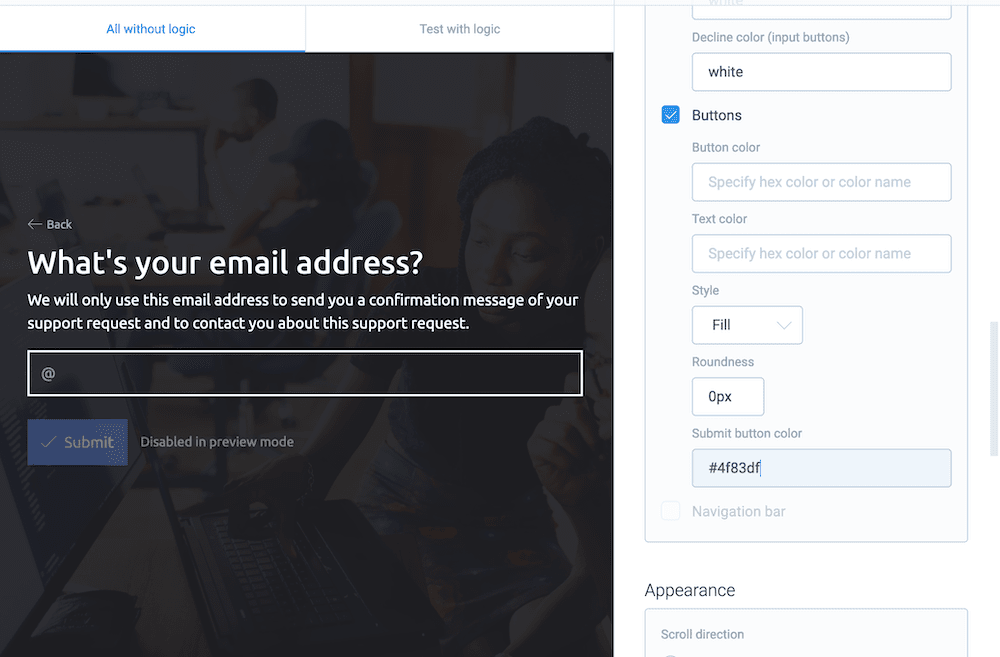
A CTA button within Tripetto. - Give your buttons premium space, with a contrasting color scheme. This will draw the user’s eyes to it, and provide a clear way to take action on your popup form in WordPress.
- Make sure that you follow up with form leads and responses in a prompt and timely fashion. It gives the user a sense of trust in what you do, and cuts out any ambiguity. What’s more, this is a snap to achieve with Tripetto’s built-in automation functionality.
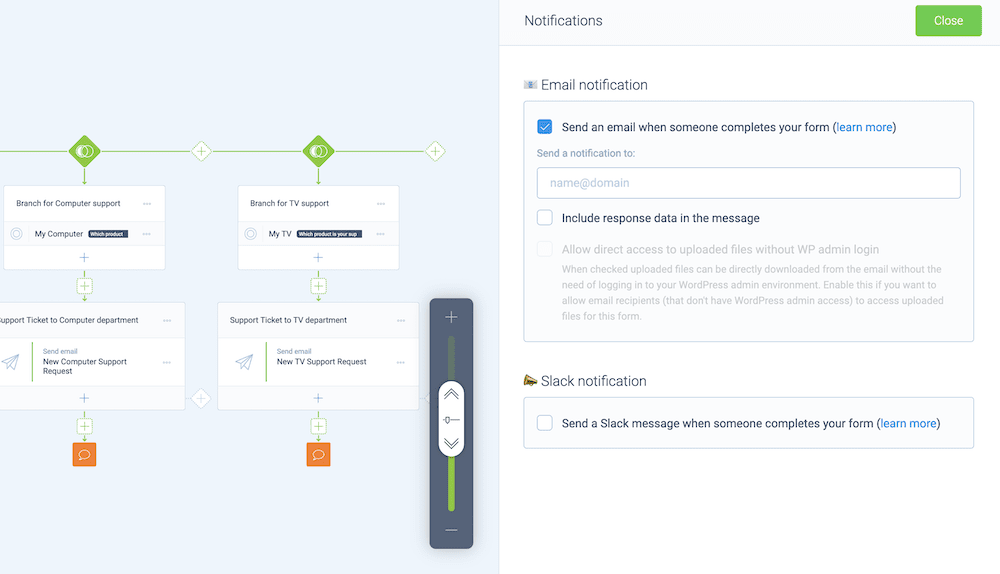
Setting up Tripetto’s notifications in the editor.
You can choose to set up and send email or Slack notifications with a couple of clicks. Tripetto uses WordPress’ built-in email functionality to send them your way, so you can take a hands-off approach with your form, and get down to other business.
Boost your form responses with a popup contact form
Regardless of whether you want to generate leads, offer customer support, or give users a simple way to get in touch, a contact form is an essential element of your WordPress website.
By extension, using popup functionality can make sure this form displays wherever the user is on your site, based on the actions you decide. This will increase completion rates, boost engagement, and take away navigation elements that could see a website visitor disengage with your form.
This tutorial gives you two ways to display a popup contact form in WordPress: Using Elementor or the Popup Maker plugin. However, you’ll need a top-notch contact form, and Tripetto can offer what you need.
It gives you an intuitive and flexible way to create smart, conversational forms using conditional logic. The drag-and-drop builder needs no code to operate, and includes almost everything you’ll need for any type of form. What’s more, all of the data stays within your WordPress database. However, with Tripetto’s webhook integrations, you can pull in your favorite third-party platforms too.
You can own a single-site Tripetto license for $99 per year. In addition, each purchase comes with a 14-day money-back guarantee.

